How to Clean Maytag Dishwasher Filter
Is your Maytag dishwasher leaving food residue on dishes, emitting foul odors, or draining slowly? The answer is often a clogged or dirty filter. Cleaning the Maytag dishwasher filter is one of the most critical maintenance tasks you can perform, and it is surprisingly simple when you know the right steps. Most modern Maytag models, including MDB-series units, use a twist-lock or removable filter system designed for easy access. Yet, many users overlook this maintenance, leading to poor performance, pump strain, and even premature appliance failure.
In this guide, you will learn how to safely remove, clean, and reinstall your Maytag dishwasher filter, regardless of your model. You will also discover how to deep clean the system, troubleshoot common issues like slimy buildup, and maintain peak performance with monthly routines.
Locate the Filter Assembly
Identify Your Filter Type
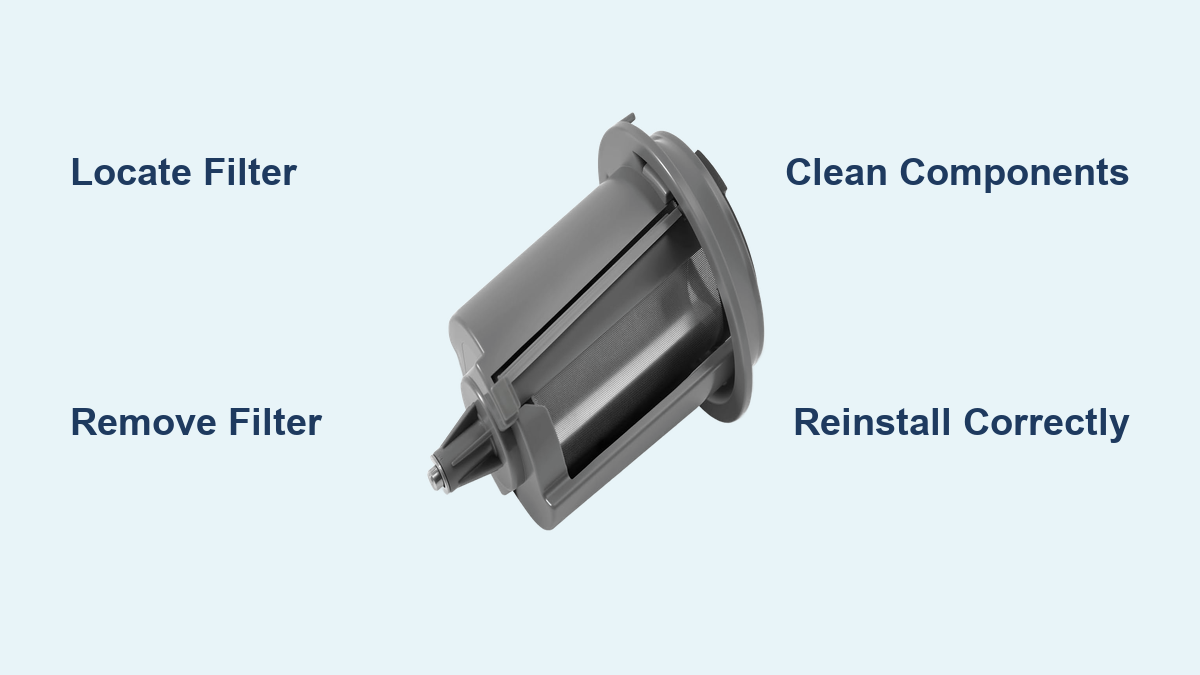
Maytag dishwashers use one of two filter systems. Knowing which you have is crucial for proper cleaning. Style 1 is the most common and features a removable cylindrical or dome-shaped filter beneath the lower spray arm. Found in MDB-series models, it twists out by hand and often has a two-part hinged design for deeper cleaning. Style 2 appears in models like the Maytag QuietSeries 200 and includes a screwed-in cover plate that must be removed with a Phillips screwdriver. This type houses a fixed filter assembly and a foreign object cup that catches large debris.
Both require regular cleaning, despite some being labeled maintenance-free. Never assume your model does not need attention, because neglect leads to clogs and pump damage.
Find the Exact Location
The filter sits at the bottom center of the tub, directly under the lower spray arm, near the sump pump and motor. Remove the bottom rack for clear access. In twist-lock models, a metal shield covers the filter and is held by spring-loaded clips. In screwed-in models, look for a circular plate secured by three screws. Older units may have semi-permanent filters connected to the motor shaft, requiring partial disassembly.
If you are unsure, consult your user manual or look for alignment cues like an arched tab on the filter that must match a recess below. Misalignment is a common cause of poor performance, so verifying position is key.
Remove the Filter Safely

Prepare the Dishwasher
Before touching any components, remove both racks to gain full access. Clear the tub of dishes, utensils, and visible debris. Check for glass shards or hard food particles, because these can damage the pump or injure you during cleaning. Wear rubber gloves for protection, especially if you have had a broken glass in the dishwasher recently. Turn off the power at the circuit breaker if you are uncomfortable working near electrical components, though power disconnection is not required for basic filter removal.
Detach the Spray Arm (Style 1)
In twist-lock models, the lower spray arm must be removed first. Locate the sprayer pipe connected to the center post. Slide it out from the base, then rotate the spray wheel counter-clockwise to detach it. Set it aside carefully. This exposes the metal shield covering the filter. In some models, the shield can be lifted without removing the spray arm, but full access requires its removal. If your model has a screw-in filter, skip this step because the cover plate is accessed directly.
Unlock and Extract the Filter
For twist-lock filters, grasp the cylindrical or dome-shaped assembly and turn it counterclockwise about a quarter to half turn. Lift it straight up. If it resists, do not force it. Try wiggling gently while pulling. For hinged models, separate the upper and lower halves by rotating them on the hinge. This allows you to clean both sides thoroughly. For screwed-in models, use a Phillips screwdriver to remove the three screws securing the cover plate. Start with the front screw and work clockwise. Place screws on a taped strip or in a small container to avoid losing them. Once screws are out, lift the plate and extract the filter assembly, secondary screen, and foreign object cup.
Clean Filter Components Thoroughly
Rinse and Scrub the Filter
Hold the filter under hot running water to flush loose food particles. Use a soft brush, like an old toothbrush or Javex brush, with dish soap to scrub both sides of the mesh. Focus on areas with white powdery deposits (hard water scale) or brown, slimy residue (biofilm), which is decomposed food. For tough mineral buildup, soak the filter in warm, soapy water or a vinegar solution (1:1 water and white vinegar) for 20 to 30 minutes. Never use steel wool, wire brushes, or abrasive pads, because they can damage the mesh or plastic components and reduce filtration efficiency.
Empty and Clean the Foreign Object Cup
This small cup, located at the front of the filter assembly, catches large debris like toothpicks, olive pits, and glass. Press down on the center tab and pull upward to remove it. Empty contents into the trash. Rinse under warm water and inspect for cracks. Reinstall by pressing it back into place until it clicks. While not required after every cycle, check it whenever drainage is slow or dishes come out dirty. A clogged cup can mimic a faulty pump.
Wipe the Filter Housing
With the filter removed, clean the sump opening and surrounding base. Use a damp microfiber cloth or sponge with dish soap. Wipe around the edges and into crevices where gunk accumulates. Place a small bowl beneath to catch runoff. Avoid using tools that could scratch the tub. Ensure no debris remains, because even small particles can interfere with reassembly or pump function. This step is often overlooked but is critical for full system hygiene.
Reinstall Filter Correctly

Align the Filter Properly
Reinstalling the filter incorrectly is a common mistake. In twist-lock models, the grated side of the lower filter must face downward. The arched tab on the filter should align with a recess in the base. This confirms correct orientation. If the upper half rotates freely, it is not locked in place. Rotate it until it seats firmly. For screwed-in models, place the filter assembly back exactly as it came out. Misalignment can block water flow or damage the pump.
Reattach Cover and Spray Arm
For twist-lock models, reinsert the spray arm by sliding the sprayer pipe back in and rotating the wheel clockwise to lock. Reconnect the two middle clips. Replace the metal shield by aligning its four tabs with the mounting ring. Press down firmly until all tabs click into place. For screwed-in models, replace the cover plate and gently reinsert the three screws. Do not overtighten, because this can strip threads or warp the plastic. Reinstall both racks, ensuring end clips engage.
Verify Secure Installation
Gently wiggle the filter, cover plate, and spray arm to confirm they are secure. In twist-lock models, the upper filter should not spin freely. The arched tab must be fully seated. If anything feels loose, disassemble and recheck alignment. A poorly seated filter can cause vibration, noise, or poor cleaning. Once everything is secure, restore power if disconnected.
Run a Test Cycle
Start with a Rinse Cycle
After reassembly, run a short rinse cycle to flush out cleaning residue and verify proper function. Place a cup of white vinegar on the top rack or a dishwasher tablet on the rack. This helps remove any lingering soap or debris from the cleaning process. Monitor the cycle for unusual noises, leaks, or drainage issues. If water pools in the tub or the spray arm does not spin, stop the cycle and recheck filter and spray arm installation.
Check for Blockages
During the cycle, observe water flow. The spray arms should rotate freely, and water should spray from all holes. If flow is weak, clean the spray arms by removing them and clearing clogged holes with a toothpick or skewer. Blocked spray arms reduce cleaning performance, leading to cloudy dishes or food residue. Also, ensure the foreign object cup is not obstructed.
Maintain Optimal Performance
Clean Spray Arms Monthly
Remove upper and lower spray arms if detachable. Inspect for clogged holes, which are common culprits including rice, pasta, and lime scale. Use a toothpick to clear blockages. Rinse under warm water and reinstall. Poor spray arm function mimics filter issues, so include this in your monthly routine.
Wipe Gasket and Door
The rubber door gasket traps mold and mildew, especially in humid climates. Wipe it weekly with a warm, soapy cloth, focusing on folds and crevices. Clean the bottom edge of the door, which is a frequent mold spot. Dry thoroughly to prevent moisture retention. A clean gasket ensures a proper seal and prevents leaks.
Deep Clean the Interior
Run a monthly deep cleaning cycle to maintain hygiene. Option 1: Place 1 cup of white vinegar in a dishwasher-safe container on the top rack. Run a hot water cycle (no dishes). This dissolves grease, detergent residue, and limescale. Option 2: After vinegar, sprinkle 1 cup of baking soda on the bottom and run another short hot cycle to neutralize odors. Option 3: Use affresh Dishwasher Cleaner. One tablet per month reaches hidden areas like the pump, valves, and hoses, preventing filming and spotting.
Troubleshoot Common Issues

Fix Persistent Slimy Buildup
If brown or grey slime returns quickly, the chopper, a motor-driven grinding blade attached to the motor shaft, may be broken. The chopper grinds food particles. When it fails, organic matter accumulates. Replace the chopper. It costs under $10 on Amazon and snaps onto the motor shaft. If slime persists after replacement, the sump pump may need servicing.
Resolve Drainage Problems
If water pools in the tub after a cycle, check the filter reinstalled correctly, the foreign object cup not clogged, the drain hose not kinked, and the garbage disposal (if connected) not clogged. If all are clear, the drain pump may be failing, especially in older units.
Reset the Clean Filter Light
Some models have a Clean Filter indicator that alerts when maintenance is due. After cleaning, hold the button for 3 seconds, then open and close the door to reset it. This confirms the task is complete and prevents false alerts.
Prevent Future Buildup
Use Rinse Aid and Soften Water
In hard water areas like Florida and Texas, calcium deposits clog filters and reduce efficiency. Use rinse aid in every cycle to prevent spotting and improve drying. For severe scale, install a water softener or run vinegar cycles bi-weekly. This extends the life of the pump, heating element, and filter.
Scrape, Do Not Rinse Dishes
Modern detergents work best with some food residue. Scrape off large chunks, but do not pre-rinse. Excessive rinsing reduces enzyme effectiveness in detergent. However, avoid putting greasy pots or heavily soiled items in without wiping, because they overwhelm the filter.
Keep a Cleaning Log
In households with frequent use or hard water, maintain a cleaning log. Note dates of filter cleaning, deep cycles, and part replacements. This helps track performance and identify recurring issues early.
Final Tips and Safety Checks
Never Run Without the Filter
Operating your Maytag dishwasher without the filter installed risks pump damage, poor drainage, and recirculation of food particles. The filter is not optional. It is essential protection for the motor and pump. If a component is damaged, replace it before running the unit.
Avoid Harsh Cleaners
While bleach can disinfect, it is not recommended for regular use, because it can degrade rubber seals, plastic parts, and stainless steel. Stick to white vinegar, baking soda, or affresh for safe, effective cleaning.
When to Call a Technician
If cleaning does not resolve poor cleaning, slow drainage, or error codes, contact Maytag support at 1-800-344-1274. A persistent seven-flash clean light indicates a heater issue. The control board detects insufficient temperature rise, and this requires professional diagnosis.
Key Takeaways for Maintaining Your Maytag Dishwasher Filter
Regular filter maintenance is the single most effective way to extend your Maytag dishwasher lifespan and ensure spotless results. Clean the filter weekly, especially with heavy use. Perform monthly deep cleans with vinegar or affresh. Inspect the foreign object cup, spray arms, and gasket regularly. Replace the chopper if slime returns. By following these steps, you will prevent clogs, eliminate odors, and keep your dishwasher running like new, even in hard water areas. Always verify correct reassembly using alignment cues, and test with a rinse cycle. This routine is not just maintenance. It is protection for your investment.
Frequently Asked Questions About Cleaning Maytag Dishwasher Filters
How often should I clean my Maytag dishwasher filter?
Clean the filter weekly if you use your dishwasher frequently or notice poor cleaning performance. For average households, cleaning every two weeks is sufficient. In hard water areas or older models, weekly cleaning prevents mineral buildup and slime accumulation.
Can I run my dishwasher without the filter installed?
No. Never operate the dishwasher without the filter. The filter protects the pump from food particles and debris. Running without it causes permanent damage to the motor and pump, leading to costly repairs or replacement.
What is the brown slime on my dishwasher filter?
The brown or grey slime is biofilm, commonly called gunga. It forms from decomposed food particles and organic matter. It indicates the chopper may be broken or the filter needs more frequent cleaning. Replace the chopper if cleaning does not prevent its return.
Do all Maytag dishwashers have removable filters?
Most modern MDB-series models have removable twist-lock filters. Older models like QuietSeries 200 have screwed-in filters that require removing a cover plate. Both types need regular cleaning, even if labeled maintenance-free.
Can I use bleach to clean my Maytag dishwasher filter?
Avoid bleach for regular cleaning. It damages rubber seals, plastic components, and stainless steel interior parts. Use white vinegar, baking soda, or affresh Dishwasher Cleaner instead. These are safe and effective alternatives.
Why does my dishwasher still smell after cleaning the filter?
Odors persist if the spray arms, door gasket, or tub interior are dirty. Run a vinegar cleaning cycle monthly. Wipe the gasket weekly. If odors continue, check the drain hose for clogs or the garbage disposal for buildup.