How to Clean Kenmore Dishwasher: Easy Steps
Is your Kenmore dishwasher leaving dishes spotty, smelling musty, or running inefficiently? Over time, food debris, hard water minerals, and mold can build up inside even in self-cleaning models. The good news: a thorough cleaning takes less than an hour and can restore your machine’s performance like new. In this guide, you’ll learn how to clean every part of your Kenmore dishwasher from the filter and spray arms to the sump, door seal, and interior plumbing using simple tools and household supplies.
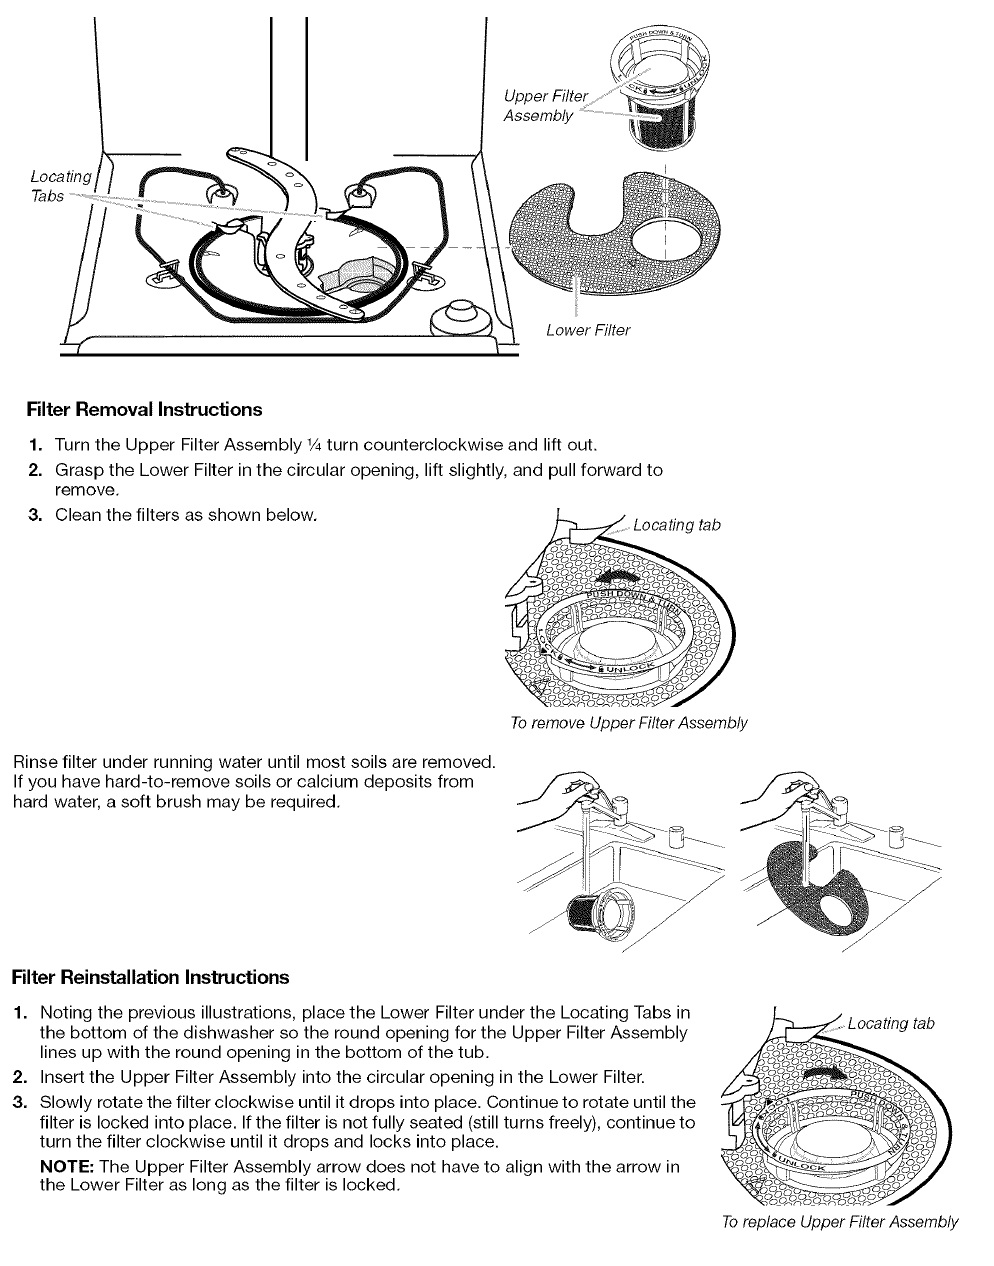
Clean the Filter Assembly
A clogged filter is the number one cause of dishwasher problems. It traps food scraps and prevents proper drainage, which leads to standing water and foul odors. Cleaning the filter regularly keeps water flowing smoothly and your dishwasher smelling fresh.
Remove the Bottom Rack
Pull out the lower dish rack to access the tub floor. This gives you clear visibility of the filter at the base of the dishwasher.
Unlock and Remove the Filter
Locate the filter in the back corner or center of the tub bottom. On most Kenmore models, twist counterclockwise to release the filter. On Model 587, turn clockwise to unlock instead. Some models have a pull-down latch that requires a gentle press to release. Lift the filter straight up and avoid forcing it if stuck.
Inspect Filter Components
Most filters have two parts that work together to catch different debris sizes. The outer fine mesh screen catches small particles while the center coarse cup holds large debris like bones or plastic scraps. Check both sections for trapped food, grease, or calcium buildup. Older models may have an extended center section that fits into the sump.
Scrub and Soak
Rinse both sections under hot water to remove loose debris. Use a soft brush or toothbrush to scrub stubborn gunk from the mesh. For deep cleaning, soak in equal parts white vinegar and hot water for 30 to 60 minutes. Add dish soap if grease is present. For heavy limescale, use CLR or Lime-A-Way instead. Never clean the filter in the dishwasher.
Reinstall Correctly
Before reinserting, ensure the fine mesh lies flat because a warped screen causes leaks. Align the filter properly and push down firmly, then turn clockwise to lock it in place. Replace the bottom rack and test by pouring a cup of water into the tub with no leaks.
Clear Spray Arm Nozzles
Clogged spray arms mean poor cleaning results. Water must spray freely from all angles to reach every dish. When nozzles are blocked, you get spotty or dirty dishes despite a full cycle.
Remove Lower Spray Arm
Grip the center hub and turn the plastic nut counterclockwise to release the lower spray arm. If stuck, check for mineral buildup around the hub. Wiggle gently and never force it. For upper spray arms, look for a rear connector or locking tab, then release and pull straight down.
Check for Blockages
Hold the arm up to light and inspect every hole carefully. Food bits and calcium often clog the top-facing jets first. Use a toothpick or small wire to clear each nozzle. Avoid metal picks because they can scratch or enlarge holes.
Soak in Vinegar
Place the arm in a bowl of white vinegar for 30 to 60 minutes. This dissolves limescale and grease effectively. For severe buildup, use CLR for 15 to 20 minutes following product instructions. Rinse thoroughly under running water to flush all debris.
Reattach and Test
Slide the lower arm back onto the hub and push down, then twist clockwise to secure it. Spin both arms by hand to confirm they rotate freely without hitting the racks.
Deep Clean the Sump and Pump
For older or heavily used models like the Kenmore Ultra Wash 665.17625691, deep sump cleaning prevents clogs and motor strain. This level of cleaning removes debris that standard cycles cannot reach.
Power Down First
Unplug the dishwasher or turn off the circuit breaker before starting. Safety is critical because this unit uses 120V and has a hot heating element that can cause burns. Wait for the interior to cool completely before proceeding.
Remove Spray Arm and Cover
Take out the lower spray arm first. Then locate the 2 to 4 screws around the pump cover using a Phillips or Torx screwdriver. Remove the screws and lift the cover. If stuck, pry gently with a flat-head screwdriver.
Clear Debris by Hand
Reach in and remove visible gunk including food chunks, plastic, leaves, or broken glass. Use needle-nose pliers for hard-to-reach items. Shine a flashlight to spot hidden debris in corners.
Clean the Chopper Blade
Some older Kenmore models have a chopper assembly under the screen. Remove the blade cover and pull out the unit. Soak in vinegar and scrub with a toothbrush. Reinstall only when fully dry and clean.
Descale with Vinegar or CLR
Spray or pour white vinegar or CLR on mineral deposits around the sump and pump. Let sit for 20 to 30 minutes. Then scrub with a soft brush. Wipe down with a baking soda paste to neutralize odors and disinfect.
Reassemble Carefully
Replace the chopper blade and screens first. Secure the pump cover with screws. Reattach the lower spray arm. Return the bottom rack to complete the reassembly.
Sanitize Interior and Door Seal
Mold and mildew love the damp environment inside your dishwasher. Cleaning the door gasket prevents leaks and foul smells that can transfer to clean dishes.
Spray Interior Surfaces
Mix equal parts water and white vinegar in a spray bottle. Spray on the tub walls, racks, detergent dispenser, and door gasket. Let sit for 5 to 10 minutes to kill bacteria and loosen grime.
Wipe Down with a Soft Cloth
Use a non-abrasive sponge to wipe all sprayed areas thoroughly. For stuck-on gunk, reapply vinegar and let it sit longer before wiping.
Treat Stains with Baking Soda
Make a paste using three parts baking soda and one part water. Apply to stained spots especially in the door gasket folds. Let sit while you work elsewhere, then scrub gently and rinse.
Inspect and Dry the Gasket
Check the rubber seal for cracks, tears, or warping and replace if damaged. Wipe the gasket dry monthly because leaving it damp encourages mold growth.
Run Cleaning Cycles
After manual cleaning, flush the system with a cycle to remove residue and sanitize internal components. This step ensures your dishwasher is ready for regular use.
Vinegar Wash Cycle
Place two cups of white vinegar in a bowl on the lower rack. Run the hottest longest cycle available such as Pots and Pans. This removes grease, mineral deposits, and odors from internal hoses.
Baking Soda Rinse
After the vinegar cycle, sprinkle one cup of baking soda on the tub floor. Run a short hot cycle such as Rinse. This leaves the dishwasher fresh and neutralized.
Use Commercial Cleaner Monthly
Try Affresh, Finish, or Glisten tablets once a month for stubborn buildup. Drop one in the empty tub and run a full cycle. This is especially effective for homes with hard water.
Never mix vinegar and bleach because toxic fumes result.
Wipe Down the Exterior
A clean outside reflects a healthy machine and keeps your kitchen looking tidy.
Clean Control Panel and Handle
Dampen a cloth with mild dish soap and water. Wipe the control panel, handle, and sides. Rinse the cloth and wipe again to remove soap residue. Avoid soaking buttons because moisture can damage electronics.
Care for Stainless Steel
If your Kenmore has a stainless finish, wipe with the grain to avoid scratches. Use a dedicated stainless steel cleaner sparingly. Never use steel wool or abrasive pads.
Preventive Maintenance Tips
Keep your dishwasher running smoothly with simple habits that prevent major problems down the road.
Rotate Wash Cycles
Do not always use Normal Wash. Switch between different cycles to prevent mineral buildup in specific jets. Use Pots and Pans for deep cleaning, SmartWash HE for efficiency mode, and Quick Wash for light loads.
Skip Heated Dry
Use air-dry instead of heated dry. This saves energy, reduces spotting on glassware, and lowers the risk of overheating internal components.
Use the Right Detergent
Only use dishwasher-specific products including pods, gel, or powder. Never use regular dish soap because it creates suds that flood the floor and damage components.
Monthly Maintenance Checklist
Run a vinegar or cleaning tablet cycle. Wipe the door gasket. Check the drain area for debris. Spin spray arms to confirm free movement.
Schedule Yearly Professional Service
Even with diligent DIY care, annual maintenance adds years to your appliance and prevents unexpected breakdowns.
What a Technician Checks
A professional will inspect the door gasket for leaks or wear. They check racks and wheels for damage. The pump and motor are examined for noise or leaks. The thermostat is tested for correct water temperature. Electrical connections are checked for corrosion. The control panel is evaluated for errors.
Benefits of Pro Service
Professional service prevents sudden breakdowns and catches small issues early. It optimizes water and energy use while extending the lifespan beyond 10 years. Ask about water softener calibration if you have hard water.
Troubleshoot Common Problems
Why Is There Standing Water
Some models retain a small amount of water to protect the seal, which is normal. But if water is excessive, check the filter for clogs that prevent draining. Inspect the drain hose for kinks. Clear the air gap if installed on the sink.
How to Fix Bad Odors
Musty smell likely comes from trapped food in the filter, mold in the gasket, or stagnant water in the sump. Clean the filter, run a vinegar cycle, and wipe the gasket thoroughly.
Dishes Not Getting Clean
This problem stems from clogged spray arm nozzles, dirty filter, hard water scale, or wrong detergent. Clean all parts and try a high-temp cycle for better results.
Is It Leaking
Most leaks come from damaged or dirty door gasket, loose hose connections, or cracked tub or cover. Clean the seal first and replace if cracked.
Model-Specific Fixes
Kenmore Model 587
The filter unlocks by turning clockwise on this model. The center filter has an extended sump section that must be seated fully. The outer screen must lie flat when reinstalling to ensure proper sealing.
Kenmore Ultra Wash 665.17625691
This older model has a chopper blade assembly that requires monthly cleaning. The pump cover is secured with Torx screws. It is prone to calcium buildup so use vinegar or CLR regularly. Spray arms may loosen over time so reseat firmly after cleaning.
Final Tips for Long-Term Success
Clean the filter every 1 to 3 months depending on household use. Run a cleaning cycle monthly using vinegar or a commercial cleaner. Inspect the door seal every 30 days to prevent leaks and mold. Never use abrasive scrubbers on any surface. Follow disassembly steps carefully and never force parts. Never mix vinegar and bleach.
A clean Kenmore dishwasher runs quieter, uses less energy, and delivers spotless dishes. Combine these DIY steps with annual professional service and your appliance will perform like new for years. Spend 60 minutes today to save hundreds tomorrow in repair costs.
Frequently Asked Questions About Cleaning a Kenmore Dishwasher
How often should I clean my Kenmore dishwasher filter?
Clean the filter every 1 to 3 months, with monthly inspection recommended for heavily used households. More frequent cleaning is needed if you notice odors or poor drainage.
Can I use vinegar to clean my Kenmore dishwasher?
Yes, white vinegar is safe and effective for cleaning the filter, spray arms, interior surfaces, and running cleaning cycles. It dissolves grease, mineral deposits, and odors without damaging components.
Why does my Kenmore dishwasher still smell after cleaning?
Persistent odors usually indicate buildup in the sump, a clogged drain line, or mold in the door gasket. Run a vinegar cycle, clean the sump area, and wipe the gasket thoroughly.
What is the best way to remove hard water deposits from my dishwasher?
Soak affected parts in white vinegar for 30 to 60 minutes or use CLR for 15 to 20 minutes for severe buildup. Rinse thoroughly after treatment to prevent residue.
Can I clean the filter in my Kenmore dishwasher in the dishwasher itself?
No, never clean the filter in the dishwasher. Hand wash it under hot water with a soft brush. Using the dishwasher to clean the filter can damage both the filter and the appliance.
Key Takeaways for Maintaining Your Kenmore Dishwasher
Regular cleaning of the filter, spray arms, and interior prevents poor cleaning performance and extends your dishwasher’s lifespan. Monthly maintenance including vinegar cycles and gasket inspection takes less than an hour but saves costly repairs. Professional annual service catches small issues before they become major problems. Following these steps ensures your Kenmore dishwasher delivers spotless, fresh-smelling dishes for years to come.