How to Install Frigidaire Dishwasher: Step-by-Step Guide
Installing a Frigidaire dishwasher doesn’t have to be overwhelming, but doing it right is essential for safety, performance, and warranty protection. Whether you’re replacing an old unit or setting up a new kitchen, this guide delivers everything you need to know: from drilling cabinet holes to final leak testing. You’ll learn how to connect water, power, and drain lines properly, level the unit like a pro, and avoid common mistakes that lead to leaks or electrical issues. If you’ve ever wondered whether to hardwire or use a power cord, how to route the drain hose correctly, or why a high loop matters, you’re in the right place.
Follow this step-by-step process using only the tools and parts listed, and you’ll have your Frigidaire dishwasher installed securely and functioning flawlessly in as little as 90 minutes.
Verify Installation Site Compatibility
Before unpacking your dishwasher, confirm your kitchen setup meets Frigidaire’s requirements. A mismatch here can delay or even halt installation.
Check Cabinet and Utility Placement
Ensure your cabinet opening is exactly 24 inches wide, which is standard for most dishwashers. The unit must sit directly beside the sink for accessible plumbing and electrical connections.
The 120V electrical supply must be within reach under the sink or behind the dishwasher location. This can be a junction box for hardwiring or a grounded outlet for plug-in models.
The hot water line should enter from the left side of the sink when facing it. This aligns with the dishwasher’s inlet valve position and minimizes hose strain.
Confirm Shut-Off Valve Condition
You must have an accessible, rust-free shut-off valve under the sink or near the dishwasher. If the valve is corroded, hidden behind insulation, or made of old plastic, professional installers will not proceed.
Use only a stainless-steel braided supply line to connect to the valve. Plastic or copper lines are not approved and increase leak risk.
Pro Tip: Consider buying a Frigidaire water connection kit costing $25 to $30. It includes the 90-degree elbow, clamp, and supply line, everything needed for a code-compliant water connection.
Gather Tools and Parts
Having the right tools on hand prevents mid-installation delays and ensures clean, safe connections.
Required Tools
You will need a Phillips screwdriver, adjustable wrench, 1/2 inch drill bit for power and water lines, 7/8 inch to 1 inch drill bit for drain hose, wire stripper if hardwiring, 24 inch level, flat-head screwdriver for door support during mounting, and 1/4 inch nut driver or star bit for junction box cover.
Included and Needed Parts
Your Frigidaire box includes the owner’s manual, silverware basket, mounting screws in a sealed bag, and sample detergent and Jet Dry.
Not included but required are a stainless-steel braided water supply line with 3/8 inch connection, 90-degree elbow fitting with 3/8 inch MPT to 3/4 inch FHT, adjustable drain-hose clamp, and optional power cord if not hardwiring.
Warning: Never reuse old hoses or clamps. Always install new, approved components to maintain warranty coverage.
Remove Old Dishwasher If Replacing
If installing in place of an old unit, removal must be done safely and completely before the new dishwasher goes in.
Disconnect Power and Water
Turn off electricity at the circuit breaker, not just the switch. Verify power is off with a voltage tester.
Shut off the hot water supply valve, then disconnect the water line using an adjustable wrench. Place a towel underneath to catch drips.
Unhook Drain and Mounting Brackets
Disconnect the drain hose from the garbage disposal or air gap. Loosen the mounting screws at the top of the unit that secure it to the countertop.
Carefully pull the dishwasher straight out, guiding wires and hoses through the cabinet. Avoid yanking, which can damage plumbing.
Note: For haul-away service, leave the old unit disconnected and beside the sink. Delivery teams won’t disconnect it for you unless specified.
Drill Cabinet Holes for New Installation
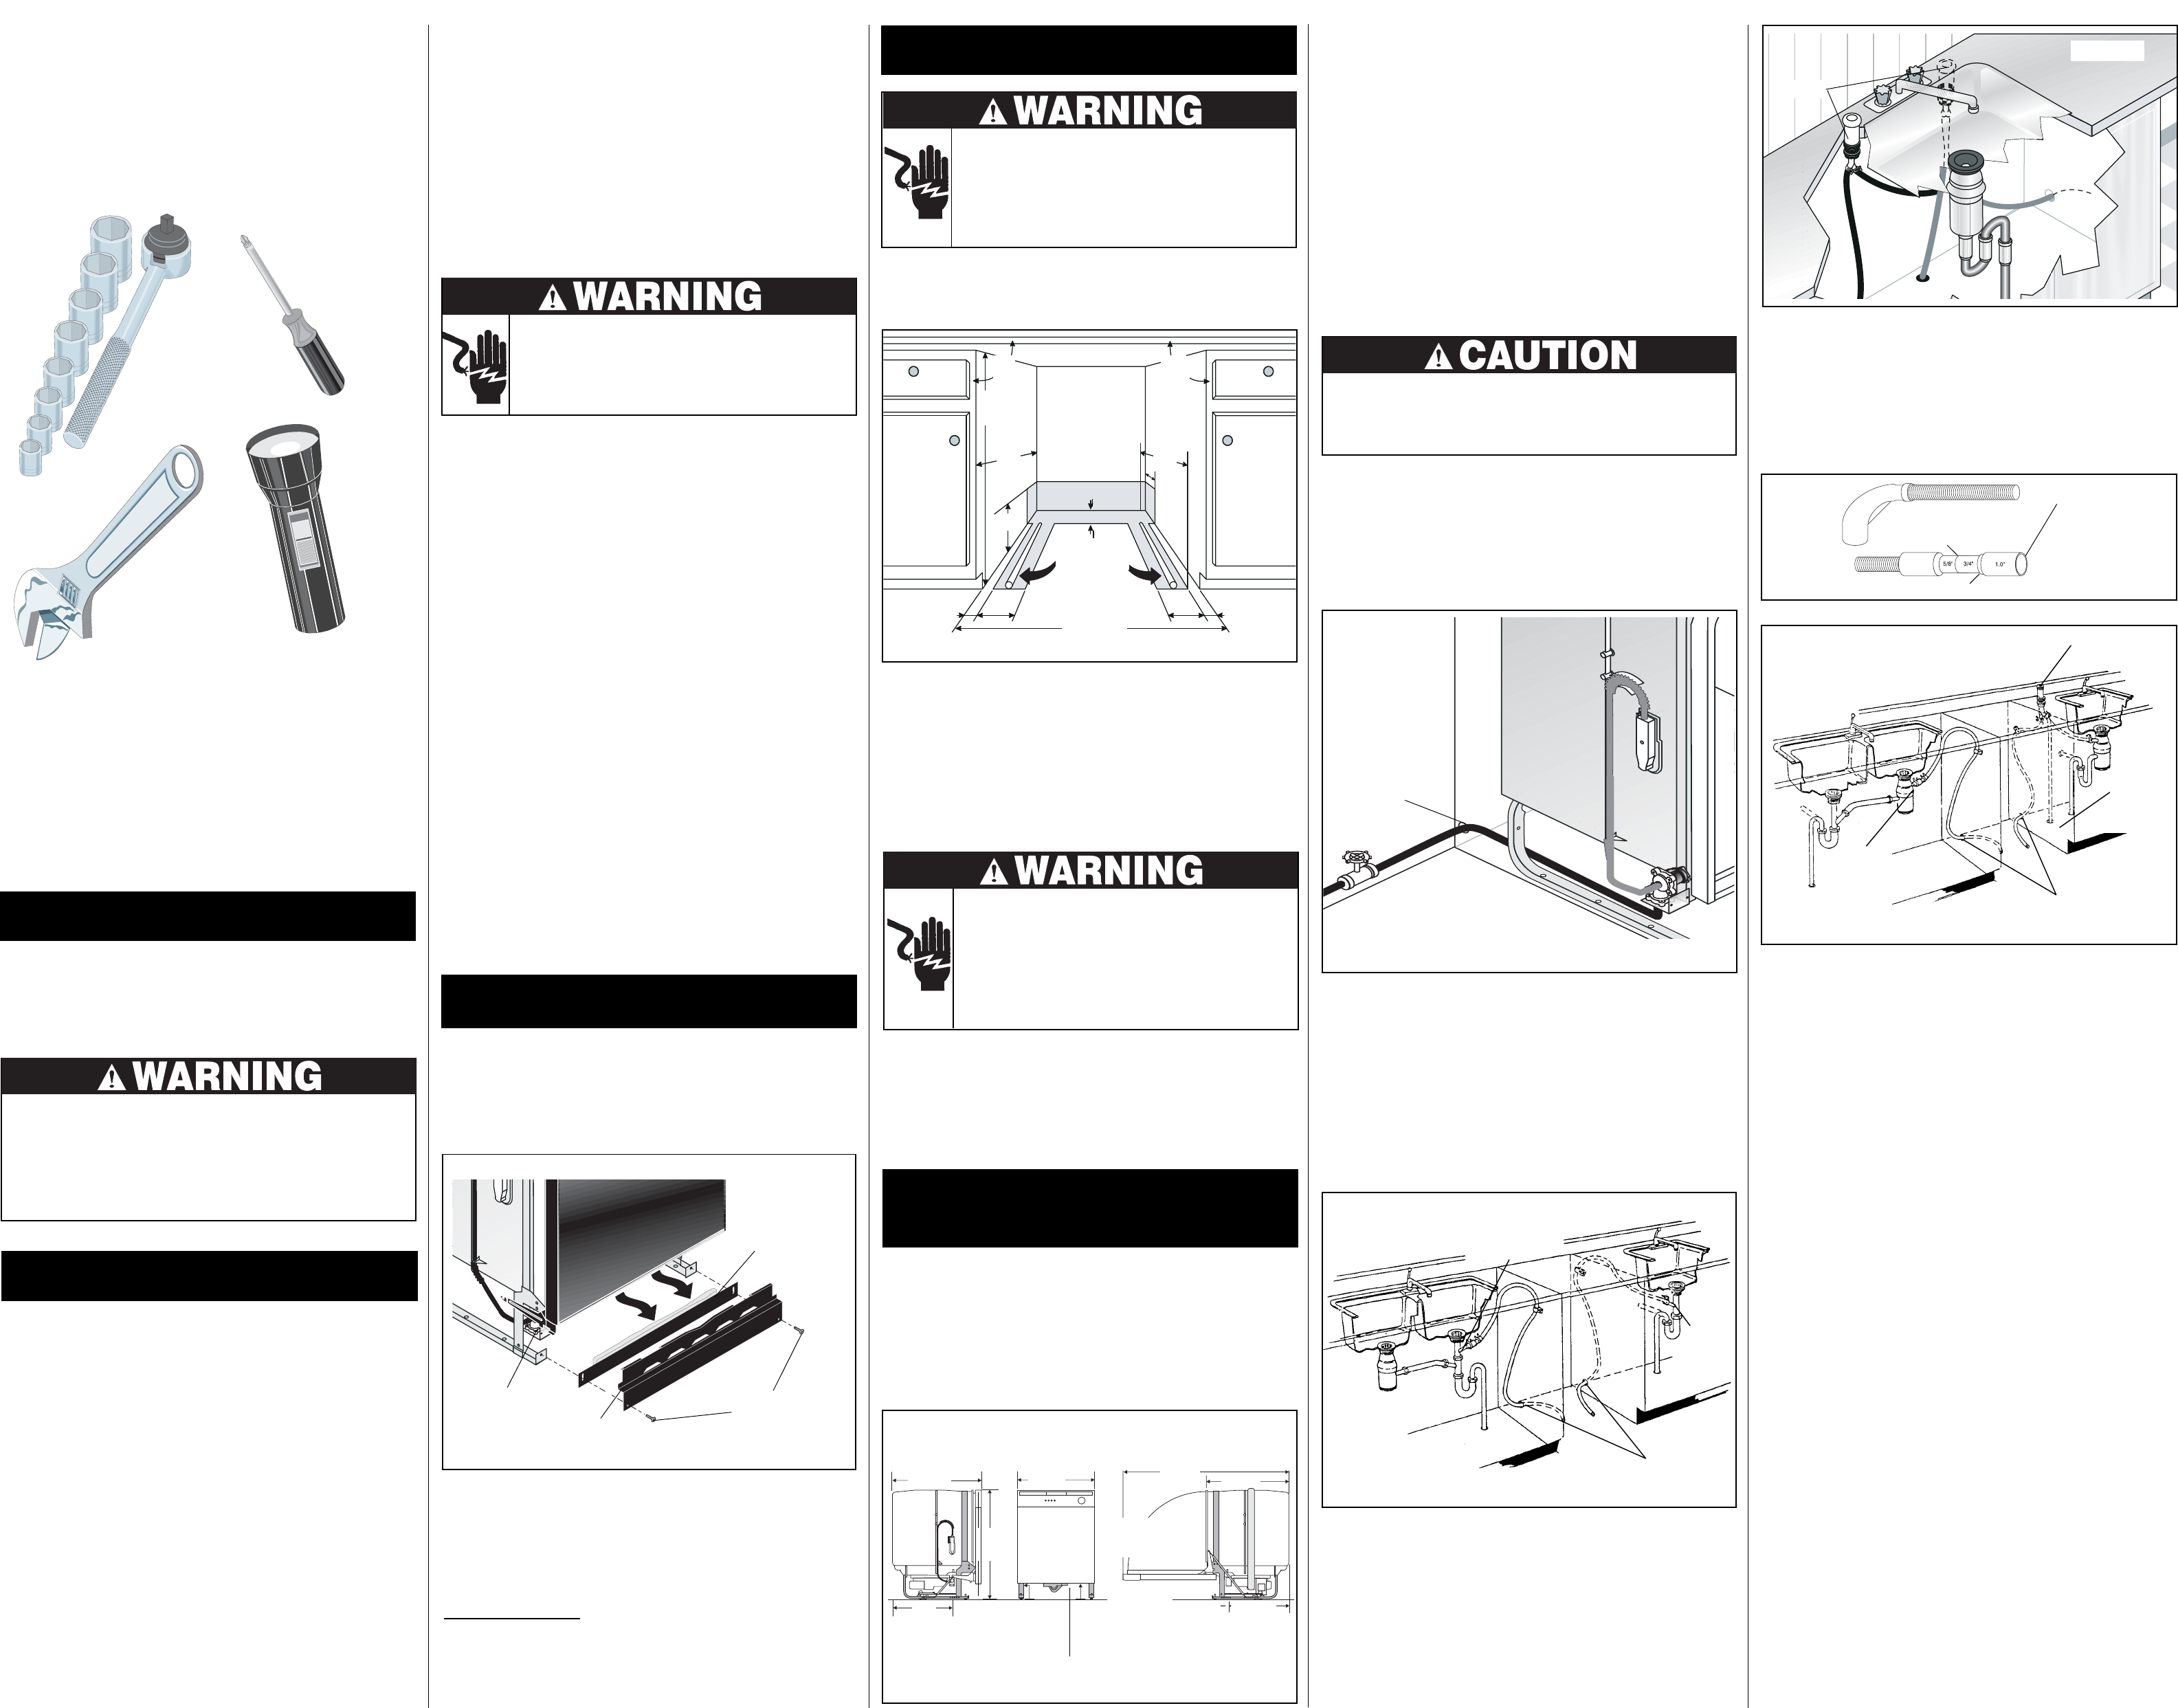
If no pre-drilled holes exist, you’ll need to create pathways for water, power, and drain lines.
Locate and Drill Entry Points
On the left cabinet wall, drill a 1/2 inch hole for the electrical cable and water supply line. On the right side, drill a 7/8 inch to 1 inch hole for the drain hose.
Position the drain inlet below the P-trap level to prevent backflow. Avoid drilling into cabinet supports or existing plumbing.
Avoid Drilling Countertops: If you have granite or stone, do not drill into the countertop. Instead, use a top-mount bracket kit sold separately to secure the dishwasher without penetration.
Connect Electrical Wiring Safely
Frigidaire dishwashers can be hardwired or plugged in. Choose based on local code and your setup.
Hardwiring Method
Feed the electrical cable through the 1/2 inch hole in the rear panel. Secure it with the clamp screw to prevent tugging.
Remove the junction box cover using a star bit or 1/4 inch nut driver. Strip wire ends just enough to expose bare copper with no nicks.
Make Proper Connections: Connect black hot wire to black terminal using a wire nut. Connect white neutral wire to white terminal using a wire nut. Connect green or bare ground wire to green ground screw, wrapping clockwise and tightening firmly.
Critical: Never reverse hot and neutral. Double-check all connections before restoring power.
Tuck wires neatly into the box and reattach the cover.
Plug-In Option If Permitted
If local codes allow, use a 6-foot flexible power cord. Plug into a grounded 120V outlet. GFCI protection is recommended but not always required.
Check Local Codes: Some municipalities require hardwiring. Confirm before choosing plug-in installation.
Install Water Supply Line Correctly

A proper water connection prevents leaks and ensures consistent fill during cycles.
Attach 90-Degree Elbow
Screw the 90-degree elbow fitting onto the dishwasher’s water inlet valve by hand only. Over-tightening can crack the plastic threads.
Tighten an additional 1/4 turn with a wrench. The elbow has a rubber washer. Crushing it causes leaks, so stop there.
Connect Supply Line
Attach one end of the stainless-steel braided line to the elbow. Hand-tighten, then snug with a wrench for 1 to 2 turns.
Route the line through the cabinet hole to the shut-off valve. Connect and tighten 1/4 to 1/2 turn past hand-tight.
Never Use Plastic or Copper Lines: Only stainless-steel braided supply lines are approved. They resist bursting and meet plumbing code.
Connect Drain Hose Without Backflow
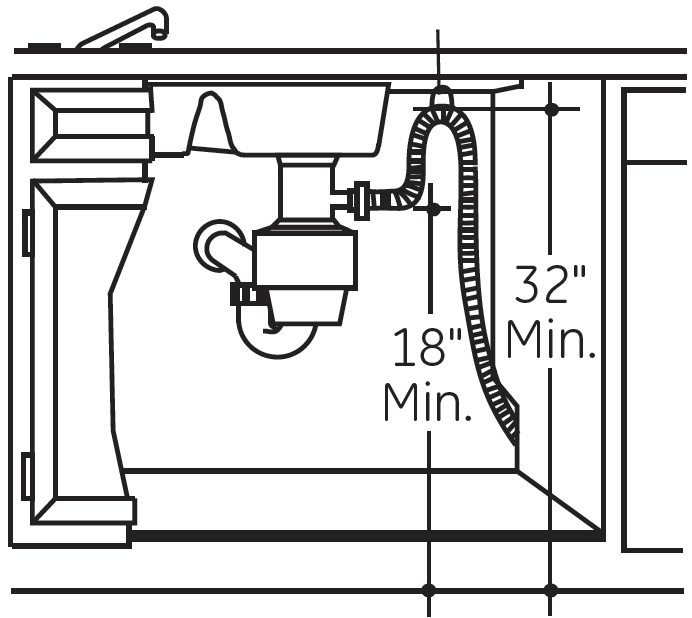
Improper drain setup causes siphoning, slow drainage, or flooding. Follow these steps to get it right.
To Garbage Disposal
Find the knock-out plug on the side of the disposal. Insert a screwdriver and tap it out with a hammer.
Slide the drain hose onto the port. Secure with an adjustable hose clamp. Tighten until snug, not compressed.
To Air Gap or Standpipe
If your code requires an air gap, run the hose up to the countertop-mounted fitting. Then connect a second hose from the air gap down to the drain pipe.
Create a High Loop
Regardless of setup, form a U-shaped high loop and secure it under the countertop at minimum 32 inches above floor. This prevents wastewater from siphoning back into the dishwasher.
Mandatory: No high loop equals risk of backflow. Frigidaire may void warranty if flooding occurs due to missing loop.
Slide In and Level the Unit
Proper alignment ensures smooth door operation and effective sealing.
Insert Dishwasher Carefully
Loosen all four leveling legs by about 1/4 inch before sliding in. This allows final adjustment.
Guide the unit into place, ensuring the control panel is flush with countertop edge, the door handle extends slightly beyond cabinet, and no pinching of wires, hoses, or supply lines.
Level Side-to-Side and Front-to-Back
Place a 24 inch level across the top front edge. Adjust front and rear feet in 3/16 inch to 5/32 inch increments.
The goal is to have the unit level side-to-side with a slight rear tilt of 1/4 inch to 1/2 inch lower at back to aid drainage.
If the door scrapes or gaps, adjust front feet height accordingly.
Pro Tip: Hold the door open with a flat-head screwdriver while securing mounting screws to prevent misalignment.
Secure to Countertop Properly
Once leveled, anchor the dishwasher to prevent movement during operation.
Use Mounting Screws or Bracket
Open the door fully. Insert supplied screws through the top brackets into the underside of the countertop.
Tighten until snug. Do not over-tighten, which can crack wood or laminate.
For Granite or Stone Countertops
Do not screw directly into stone. Use a top-mount bracket kit available separately that clamps to the cabinet and attaches to the dishwasher without penetrating the countertop.
Warning: Improper mounting can void warranty and cause door seal failure.
Install Kick Plate
The kick plate protects internal components and gives a finished look.
Attach and Secure
Align the pins on the grille with the slots on the dishwasher base. Slide it backward until it clicks into place.
Secure with Phillips screws or a 1/4 inch nut driver at the bottom.
Final Alignment Check
Ensure the kick plate sits flush with cabinet base, does not interfere with door opening and closing, and is level and gap-free.
Fix Misalignment: Loosen screws slightly and reposition before fully tightening.
Test for Leaks and Functionality
Never skip the final test. It catches issues before they become costly problems.
Restore Power and Water
Turn on the shut-off valve. Restore electrical power at the breaker.
Run a Test Cycle
Remove protective films from tub and control panel. Add detergent if desired. Start a normal wash cycle. During fill, briefly open the door to release internal pressure, which is safe and normal. Cancel the cycle by holding Start for 3 seconds. The unit will drain automatically.
Inspect for Leaks
Check under the dishwasher for drips at water inlet or pump housing, moisture at drain hose or garbage disposal connection, and wetness around junction box or clamp points.
If leaks appear, turn off water and re-tighten connections slightly. Never over-tighten.
Test Door Operation
Open and close the door several times. It should move smoothly without scraping, seal tightly with no gaps, and the kick plate must remain secure.
Success Signal: No leaks, smooth operation, and complete drainage equals installation complete.
Handle Special Installation Cases
Some kitchens require extra steps or parts to meet code and safety standards.
Granite or Stone Countertop Install
Avoid drilling into stone. Use a top-mount bracket instead of direct screws. This preserves the countertop seal and prevents cracking.
Extended Reach Needs
Standard lengths include 6-foot power cord, 6-foot water line, and 6-foot drain hose.
If your connections are farther, you’ll need an extended stainless-steel supply line, longer drain hose with clamp, and extended power cord or junction box extension.
Caution: Modifications beyond 6 feet may require a licensed plumber or electrician and are not covered by standard service policies.
Maintain for Longevity and Performance
Proper care keeps your Frigidaire dishwasher running efficiently for 10 to 13 years.
Monthly Maintenance
Clean the filter assembly at the bottom of the tub. Run a vinegar rinse every 1 to 2 months to remove mineral buildup. Use rinse aid like Jet Dry to prevent spotting and improve drying.
Annual Checks
Inspect drain hose for kinks or clogs. Test door gasket for cracks or leaks, replacing every 5 to 7 years. Verify water inlet valve for sediment buildup.
Warranty Protection
Standard coverage is 1 year parts and labor. Extended warranties are available. Improper installation voids warranty, so use only approved parts and methods.
Key: Use stainless-steel lines, proper grounding, and high loop to stay compliant.
Final Verification Checklist
Before calling the job done, run through this quick checklist. Verify you have an accessible, rust-free shut-off valve. Confirm a stainless-steel braided supply line was used. Check that electrical connections are secure and grounded. Ensure drain hose is clamped with high loop installed. Confirm the unit is level with slight rear tilt. Verify mounting screws or bracket are secured. Check that kick plate is flush and non-interfering. Ensure no pinched wires or kinked hoses. Confirm test cycle completed and drained. Verify zero leaks observed. Confirm door opens and closes smoothly.
Frequently Asked Questions About Installing a Frigidaire Dishwasher
Do I need a professional to install a Frigidaire dishwasher?
Many homeowners install Frigidaire dishwashers themselves with moderate DIY experience. If you have basic plumbing and electrical knowledge, you can complete the installation in 1.5 to 3 hours. However, if your kitchen lacks existing connections or you have granite countertops requiring special brackets, professional installation is recommended.
Can I install a Frigidaire dishwasher myself?
Yes, you can install a Frigidaire dishwasher yourself if you have the required tools, including a Phillips screwdriver, adjustable wrench, drill bits, and level. You must also have basic knowledge of electrical connections and plumbing. Follow all safety steps, including turning off power at the circuit breaker before beginning.
How long does it take to install a Frigidaire dishwasher?
Installation typically takes 90 minutes to 3 hours depending on your experience level and whether you’re replacing an existing unit or installing in a new location. Removing an old dishwasher adds time, while new cabinet drilling also extends the process.
What tools do I need to install a Frigidaire dishwasher?
You need a Phillips screwdriver, adjustable wrench, 1/2 inch drill bit for power and water lines, 7/8 inch to 1 inch drill bit for drain hose, wire stripper if hardwiring, 24 inch level, flat-head screwdriver, and 1/4 inch nut driver or star bit for the junction box.
Why is a high loop required for dishwasher drain installation?
A high loop prevents wastewater from siphoning back into the dishwasher. Without it, dirty water can flow back into the unit during drainage cycles, causing unsanitary conditions and potential flooding. Frigidaire may void your warranty if flooding occurs due to a missing high loop.
Key Takeaways for Installing Your Frigidaire Dishwasher
Installing a Frigidaire dishwasher requires careful attention to three critical areas. First, always use stainless-steel braided supply lines and proper drainage connections including a high loop to prevent leaks and backflow. Second, ensure electrical connections are secure and properly grounded whether hardwiring or using a power cord. Third, level the unit with a slight rear tilt and secure it firmly to the countertop to ensure smooth door operation and proper sealing.
Your Frigidaire dishwasher is now ready for daily use. Refer to the owner’s manual for cycle options, cleaning tips, and troubleshooting. Enjoy spotless dishes and quiet operation. Your hard work pays off every time you hit Start.