How to Fix a Leaking Dishwasher: Quick Steps
A leaking dishwasher isn’t just a mess, it’s a ticking time bomb for water damage, mold growth, and costly repairs. If you’ve noticed puddles on the kitchen floor after a cycle, the problem likely stems from a worn seal, clogged filter, loose hose, or user error. The good news is that most leaks are fixable without calling a technician. With the right tools and a step-by-step approach, you can diagnose and repair the issue in under two hours, often for less than $15.
This guide breaks down every possible cause of a leaking dishwasher, from the most common issues like a dirty gasket to model-specific failures such as diverter valve seal leaks in KitchenAid units. You will learn how to pinpoint the source, apply proven fixes, and prevent future leaks with simple maintenance. Whether you are a seasoned DIYer or a first-time repairer, this actionable plan will get your dishwasher running cleanly and safely.
Identify the Leak Source
Before grabbing tools, watch the dishwasher run. A mid-cycle inspection reveals more than a post-leak cleanup ever could. Pull out the lower rack, remove the kickplate, and use a flashlight to scan for drips. Pause the cycle during fill to check water levels. If it is above the heating element, overfilling is likely.
Place dry towels around the base and under the door. After the cycle, note where moisture appears. Leaks at the front edge point to a door gasket or alignment issue. Leaks under the unit indicate pump seals, hoses, or tub cracks. Moisture behind the kickplate suggests drain hose or clamp failure. Pooling at the base inside the tub with no obvious external source often means a diverter valve seal leak, common in KitchenAid models.
Test one fix at a time and run a short rinse cycle after each step. This isolates the real culprit and prevents wasted effort on unrelated components.
Check for External Leaks
Start with the most accessible areas. Inspect the door seal by running your finger along the rubber gasket. Look for cracks, warping, or food debris caught in the groove. Check hose connections where the water supply and drain lines attach. Look for moisture, mineral buildup, or loose fittings.
Feel for dampness behind the kickplate area. This often points to a leaking drain hose. Tighten connections by hand plus a quarter-turn with pliers. Never overtighten plastic fittings because they crack easily.
Locate Internal Drips
If no external leak is visible, run a rinse cycle and open the door mid-spin. Shine a light into the sump area at the bottom center. Water dripping from above could indicate a failed diverter valve seal. Pooling at the base with no obvious source means checking the float switch or inlet valve for overfilling.
Use a dollar bill test to check gasket seal. Close the door on a bill at multiple points around the perimeter. If it slides out easily at any spot, the gasket is not sealing properly at that location.
Replace a Damaged Door Gasket
A worn door seal is the number one cause of front-edge leaks. Over time, the rubber hardens, cracks, or flattens, breaking the watertight barrier. This is a straightforward repair that typically costs under $15 for the part.
Remove and Clean the Old Seal
Pull the dishwasher forward by unscrewing the two top mounting screws under the countertop. Gently slide the unit out after turning off power and water at the supply. Grasp the gasket at the bottom center and pull straight down. It detaches easily without tools. Note the notch on the right end because this marks the correct orientation for reinstallation.
Clean the seal channel by wiping the groove with warm, soapy water. Remove mildew, food particles, and mineral deposits that could prevent the new seal from seating properly.
Install the New Gasket
Insert the new seal starting at the notched right end. Press it firmly into the groove, working clockwise around the door. Ensure it is fully seated with no gaps, wiggling, or bulges. Slide the dishwasher back in, reattach the top screws, and check door alignment.
Run a rinse cycle with a towel underneath to test the repair. No leaks mean you have saved $100 or more on a service call. Apply a pea-sized drop of food-grade silicone lubricant annually to keep the gasket flexible.
Clean the Filter Assembly
A clogged filter is the second most common cause of overflow and leaks. When debris blocks the sump, water backs up and spills out over the door or onto the floor.
Remove and Inspect the Filter
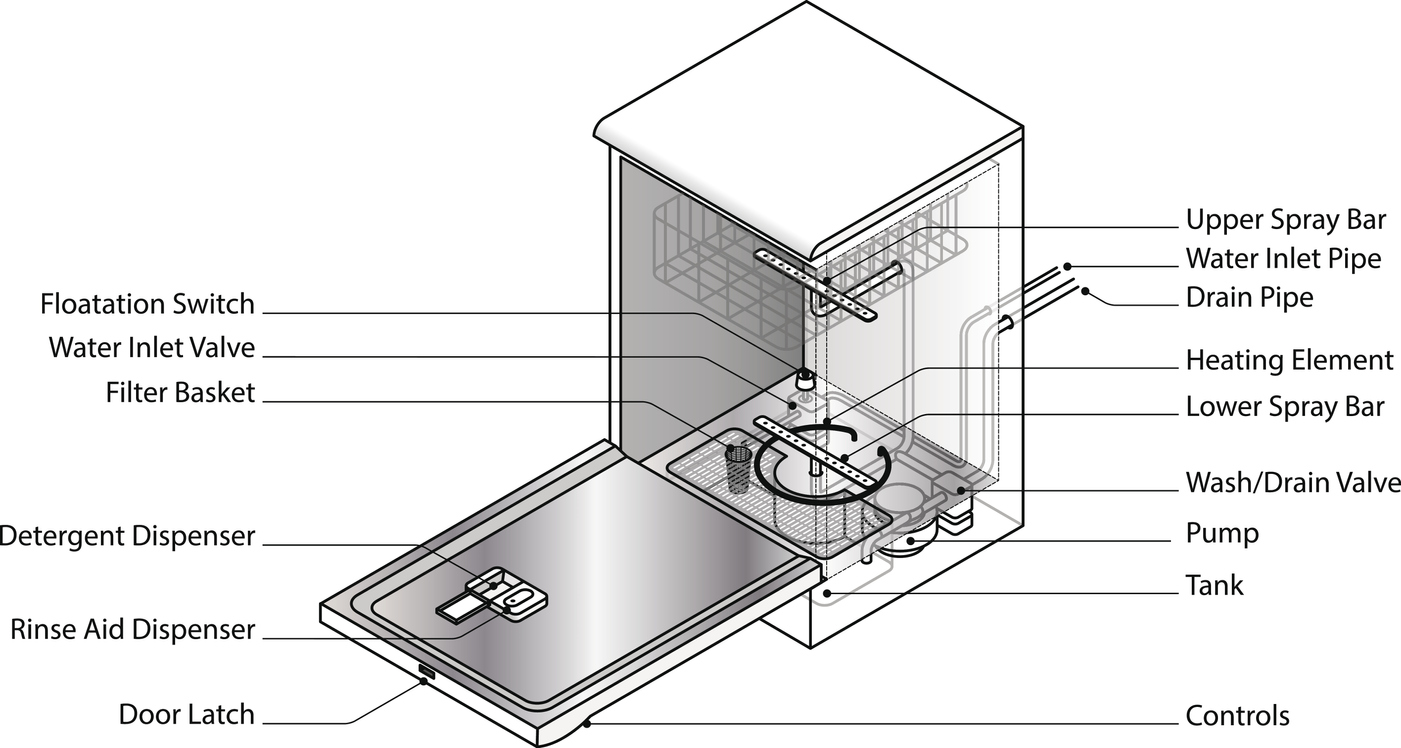
Open the dishwasher and look at the tub bottom. Grab the round, semi-transparent filter at the center. Pull it straight up because it is clipped in place. Disassemble into coarse and fine mesh layers for thorough cleaning.
Deep Clean the Filter
Rinse the filter under hot water. Scrub with a toothbrush to remove grease and food gunk. Check the sump below for hidden debris that could be causing backups. Reinstall the filter securely because misalignment causes leaks and error codes.
Clean the filter every one to two weeks in busy households. Use a monthly vinegar rinse by placing one cup of white vinegar in a bowl on the top rack and running a hot cycle.
Clear a Clogged or Kinked Drain Hose
A blocked drain hose causes slow drainage, gurgling sounds, and water pooling under the unit. This is a common issue that is often overlooked during basic troubleshooting.
Disconnect and Flush the Hose
Turn off power and water. Remove the kickplate screws and lower the panel. Locate the black drain hose that connects to the garbage disposal or air gap. Check for kinks and ensure there is a high loop under the sink to prevent siphoning.
Detach both ends of the hose, one from the dishwasher pump and one from the disposal or drain. Flush with warm water using a faucet or garden hose. Use a bottle brush to scrub the interior and remove buildup.
Reconnect and Secure
Reattach both ends using new stainless steel clamps because they outlast plastic ones. Ensure no sharp bends remain in the hose path. A wet or dry vacuum can suck out stubborn clogs from the disposal side if flushing does not work.
Tighten or Replace Hose Connections
Loose or degraded fittings leak silently over time, damaging floors and cabinets. These leaks are easy to fix but often go unnoticed until significant water damage occurs.
Inspect All Connections
Check the water supply line to the hot water inlet, the drain hose to the pump, and the pump outlet to the hose. Look for dampness or mineral rings around fittings. Check for cracked plastic or swollen rubber washers.
Fix Loose or Damaged Fittings
Tighten by hand, then a quarter-turn with a wrench. Replace worn washers or clamps. Consider upgrading to braided stainless steel supply lines for durability. Place a towel beneath connections because residual water will drip out when disconnecting.
Diagnose a Faulty Float Switch
The float switch stops water intake when the tub fills to the correct level. If stuck, the dishwasher overfills and leaks from the door or base.
Test Float Movement
Open the dishwasher during fill and look at the plastic float in the front corner near the spray arm. Push it up and down. It should move freely without resistance. Clean with vinegar if mineral buildup restricts motion.
Replace if Necessary
If the float is cracked or the switch fails electrically, replacement is needed. This involves electrical work, so call a technician unless you are experienced with appliance electronics. Use a multimeter to test continuity. No reading means the switch is dead.
Unclog the Spray Arm
Blocked nozzles increase pressure inside the tub, forcing water past the door seal. This causes leaks during the wash phase even when other components are working correctly.
Remove and Clean the Arm
Take out the lower rack. Unscrew or unclip the spray arm, which varies by model. Rinse under warm water. Clear clogged holes with a toothpick. Ensure the arm spins freely when reinstalled.
Clean spray arms every three to six months, especially in hard water areas where mineral deposits build up quickly.
Level the Dishwasher
An unlevel unit causes water to pool and spill out the front instead of draining properly. This is an often-overlooked cause of front-edge leaks.
Adjust the Front Feet
Place a spirit level across the closed door. The ideal tilt is one-eighth inch backward because this helps the door seal properly. Turn front feet clockwise to raise and counterclockwise to lower. Recheck after sliding the unit back into the cabinet.
Flooring shifts over time, so re-level annually or after any kitchen work that could disturb the appliance.
Fix a Failed Diverter Valve Seal

Common in KitchenAid and Kenmore models, a failed rubber seal under the spray arm allows water to drip into the base. This is a model-specific issue that is easy to fix with a $5 part.
Remove the Sound Baffle
Unscrew two Phillips screws under the lower rack. Lift out the panel to access the diverter valve area.
Replace the Double-Ring Seal
Remove the spray arm by rotating slightly counterclockwise and lifting. Disconnect the black hose on the left by loosening the clamp and pulling it out. Pull the white hose on the right straight out because it has no clamp.
Extract the old seal using needle-nose pliers or a drywall screw to lift the brittle rubber. A small spring may be present. Reuse it if intact.
Install the new seal by applying one drop of liquid dishwasher soap for lubrication. Press in by hand, then use a socket to seat it flush. The double rings must face upward. Reattach the diverter valve, which snaps into place. Reconnect hoses and reinstall the spray arm by turning clockwise to lock.
Run a rinse cycle first, then a full load to test the repair. No drips mean success. A $5 seal can save an $800 dishwasher.
Prevent Future Leaks
Most leaks are preventable with routine care and proper maintenance. A small investment of time saves significant repair costs down the road.
Follow a Maintenance Schedule
Clean the filter every one to two weeks. Inspect the gasket quarterly. Flush the drain hose every six months. Clean spray arms every three to six months. Run a vinegar rinse quarterly. Lubricate the gasket annually.
Use the Right Detergent
Only use automatic dishwasher detergent. Never use regular dish soap. Avoid overfilling the dispenser. Store tablets and gels in sealed containers to prevent clumping from moisture.
Load Dishes Properly
Do not block spray arms with large items. Ensure the door closes smoothly without resistance. Do not overload because water needs circulation to work properly.
When to Call a Pro
DIY fixes work for 80% of leaks. Call a technician if the tub is cracked because epoxy is only a temporary fix. Call if pump or internal seals are leaking. Call if electrical components need replacement. Call if the leak persists after all basic fixes.
Many home warranties cover pump, valve, and seal repairs. Check your policy before filing a claim.
Frequently Asked Questions About Fixing a Leaking Dishwasher
Why is my dishwasher leaking from the front door?
A front-door leak usually means a worn or damaged door gasket. The rubber seal around the door perimeter hardens and cracks over time, breaking the watertight barrier. Clean the gasket first to remove debris. If cracks or gaps are visible, replace the seal. This is the most common cause of dishwasher leaks and costs under $15 to fix.
Can a clogged filter cause my dishwasher to leak?
Yes, a clogged filter causes water to back up and overflow onto the floor. The filter at the bottom of the tub traps food particles. When blocked, water has nowhere to go except out the door or under the unit. Clean the filter monthly, or every two weeks in high-use households.
How do I know if my dishwasher is leaking from the pump?
Pump leaks create puddles beneath the dishwasher after every cycle. You may also hear dripping sounds when the unit is off. Inspect the area near the motor and pump after a cycle. If moisture is present there, the pump seal has failed and requires professional replacement.
Is a leaking dishwasher an emergency?
A leaking dishwasher should be addressed promptly to prevent water damage to flooring, cabinets, and subflooring. Turn off the dishwasher and do not run it until the leak source is identified. Place towels around the base to contain water damage while you troubleshoot.
How much does it cost to fix a leaking dishwasher?
Most DIY repairs cost between $5 and $30 for parts. A door gasket runs $9 to $13. A diverter valve seal costs about $5. Professional repairs typically range from $150 to $400 depending on the component and labor in your area.
Should I repair or replace a leaking dishwasher?
If the dishwasher is more than 10 years old and the leak comes from a cracked tub or failed pump, replacement is often more cost-effective. Minor leaks from seals, filters, or hoses are worth repairing. Calculate repair costs against the appliance age. If repairs exceed half the cost of a new unit, consider replacement.
Key Takeaways for Fixing Your Leaking Dishwasher
Most dishwasher leaks stem from a handful of common issues that are easy to diagnose and repair yourself. The door gasket is the number one culprit, followed by clogged filters, loose hose connections, and improper detergent use. Watching the dishwasher run during a cycle is the fastest way to identify where the leak originates. Always test after each repair step with a short rinse cycle before running a full load.
Preventive maintenance goes a long way. Clean the filter monthly, inspect the gasket quarterly, and run vinegar rinses to dissolve mineral buildup. Use only automatic dishwasher detergent and avoid overloading the racks. These simple habits prevent most leaks from occurring in the first place.
For model-specific issues like the diverter valve seal in KitchenAid and Kenmore units, a $5 part and about an hour of your time can save an $800 appliance. Internal failures like cracked tubs or pump seal leaks require professional service, but these account for only about 20% of leak cases. With systematic troubleshooting and basic tools, you can resolve most dishwasher leaks without ever calling a technician.