How to Fix Dishwasher Rack Issues
Is your dishwasher rack wobbling, sticking, or rusting? You’re not alone. Over time, dishwasher racks face wear from heat, detergents, and mechanical stress, leading to broken adjusters, jammed rails, and rusted tines. The good news? Most issues can be fixed in under 30 minutes without replacing the entire rack. In this guide, you’ll learn how to diagnose common problems, replace broken parts, clean buildup, and prevent future damage, saving hundreds compared to buying a new rack or appliance.
Whether you own a Whirlpool, Frigidable, GE, Bosch, or Samsung, these proven repair strategies work across brands and models. From metal-screw adjuster upgrades to $8 rust caps that stop dish staining, we’ll walk you through every fix using tools and supplies you likely already have.
Replace Broken Rack Adjusters
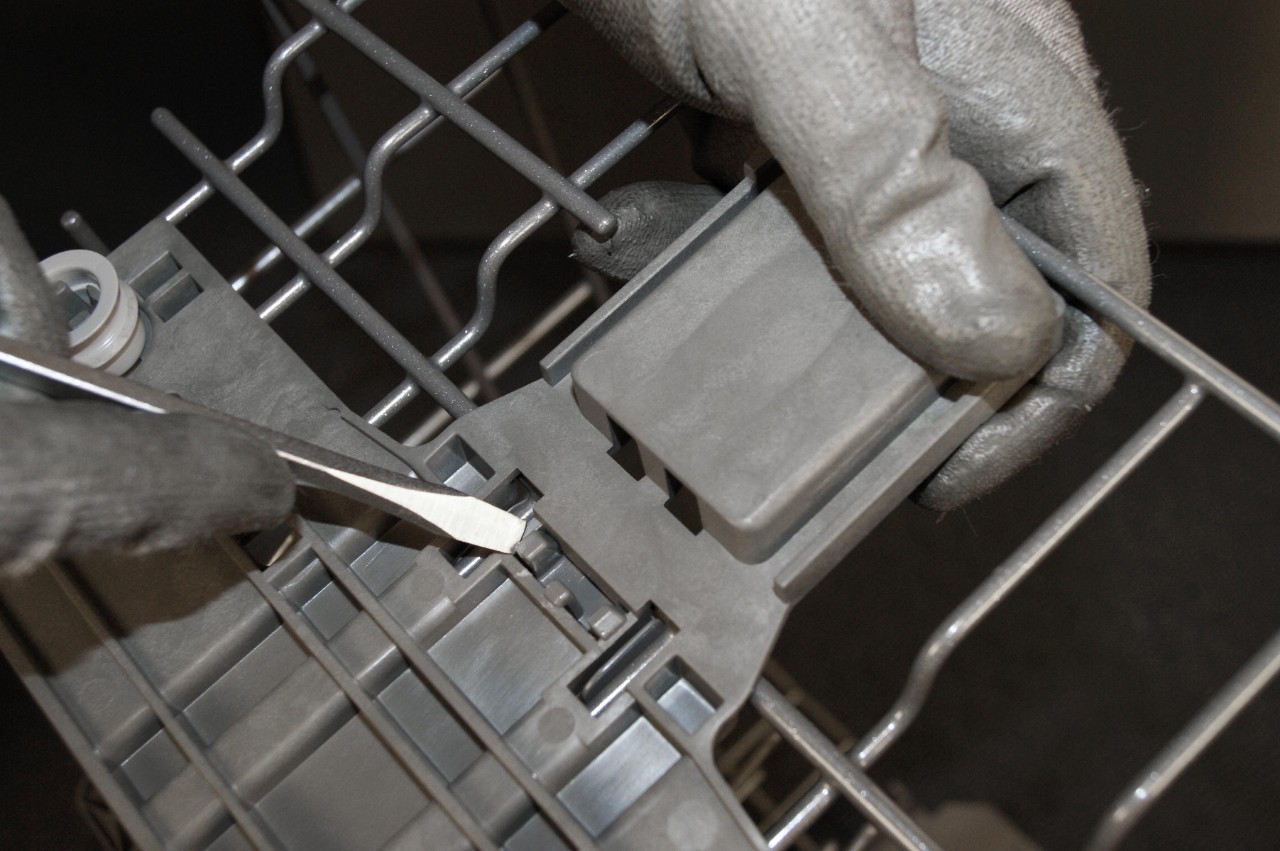
One of the most common dishwasher rack failures is a broken plastic adjuster, the bracket that holds the wheels in place. When these crack, the rack sags, jams, or falls off entirely. This is especially common in Whirlpool and KitchenAid models after 5 to 7 years of use.
Identify Failed Adjusters
Look for these warning signs:
- Cracked plastic tabs on the side brackets
- Missing or loose wheels
- One side of the rack lower than the other
- Grinding or wobbling during movement
If the wheel spins freely but the bracket is cracked, replacement is needed. Don’t waste time trying to glue it. Plastic fatigue makes repairs temporary.
Install Aftermarket Adjusters with Metal Screws
OEM parts often reuse weak plastic clips. Upgrade to aftermarket adjusters with metal screws for long-term durability.
Steps:
- Pull the rack fully out and lift slightly to clear the rails.
- Lay it on a flat surface.
- Use a slotted screwdriver to pry off the old bracket.
- Align the new bracket with the mounting holes.
- Secure with included metal screws. No glue or clips needed.
- Reattach the wheel and test rotation.
Pro Tip: Clean the rail before reinserting the rack. Buildup can cause misalignment even with new brackets.
Most kits cost $10 to $25 for a pair and fit specific models. Verify your dishwasher’s model number before ordering. Users report these last 5 plus years with no recurrence.
Fix Sticking or Jammed Rails
If your rack drags, squeaks, or sticks mid-pull, the issue is likely limescale, grease, or track warping, not a broken part. This is common in hard water areas and with frequent use of low-quality detergents.
Clean Rails with Vinegar Solution
A 1 to 1 vinegar-water mix dissolves light mineral buildup.
Steps:
- Remove the rack.
- Soak a cloth in vinegar solution.
- Wipe down both rails and roller contact points.
- Scrub crevices with an old toothbrush.
- Dry thoroughly with a microfiber cloth.
Warning: Vinegar alone won’t fix severe buildup or mechanical wear. Use it as part of a full maintenance routine.
Use Commercial Cleaner for Deep Buildup
For stubborn grime, run a Finish Dishwasher Cleaner cycle monthly. Place the tablet upright in the empty dishwasher and run a full hot cycle. Follow with a vinegar wipe-down. User tests show this removes sticky residue and improves rack glide, especially in GE and older Frigidaire models.
Realign Frigidaire Height-Adjustment Pins

If your upper rack won’t raise or lower on one side, the height-adjustment pin has likely rotated out of its track. This is a frequent issue in Frigidaire Gallery models.
Check Pin Alignment
- Remove the rack completely.
- Flip it upside down.
- Compare both sides. Is one pin facing upward instead of seated in the guide?
Misalignment usually happens when users force the rack closed or overload one side.
Rotate Pin Back into Position
Steps:
- Grip the misaligned pin with needle-nose pliers.
- Apply steady pressure to rotate it back into the track.
- Ensure the actuator slides smoothly.
- Reinstall the rack and test adjustment.
Pro Tip: This 10-minute fix avoids a $120 plus rack replacement. Success rate is over 85 percent long-term.
No parts needed. Just patience and pliers.
Stop Rust from Staining Dishes
Flaking black coating and rust on tine tips are more than cosmetic. They can stain porcelain, glassware, and even leach into food over time.
Apply Tine Repair Caps
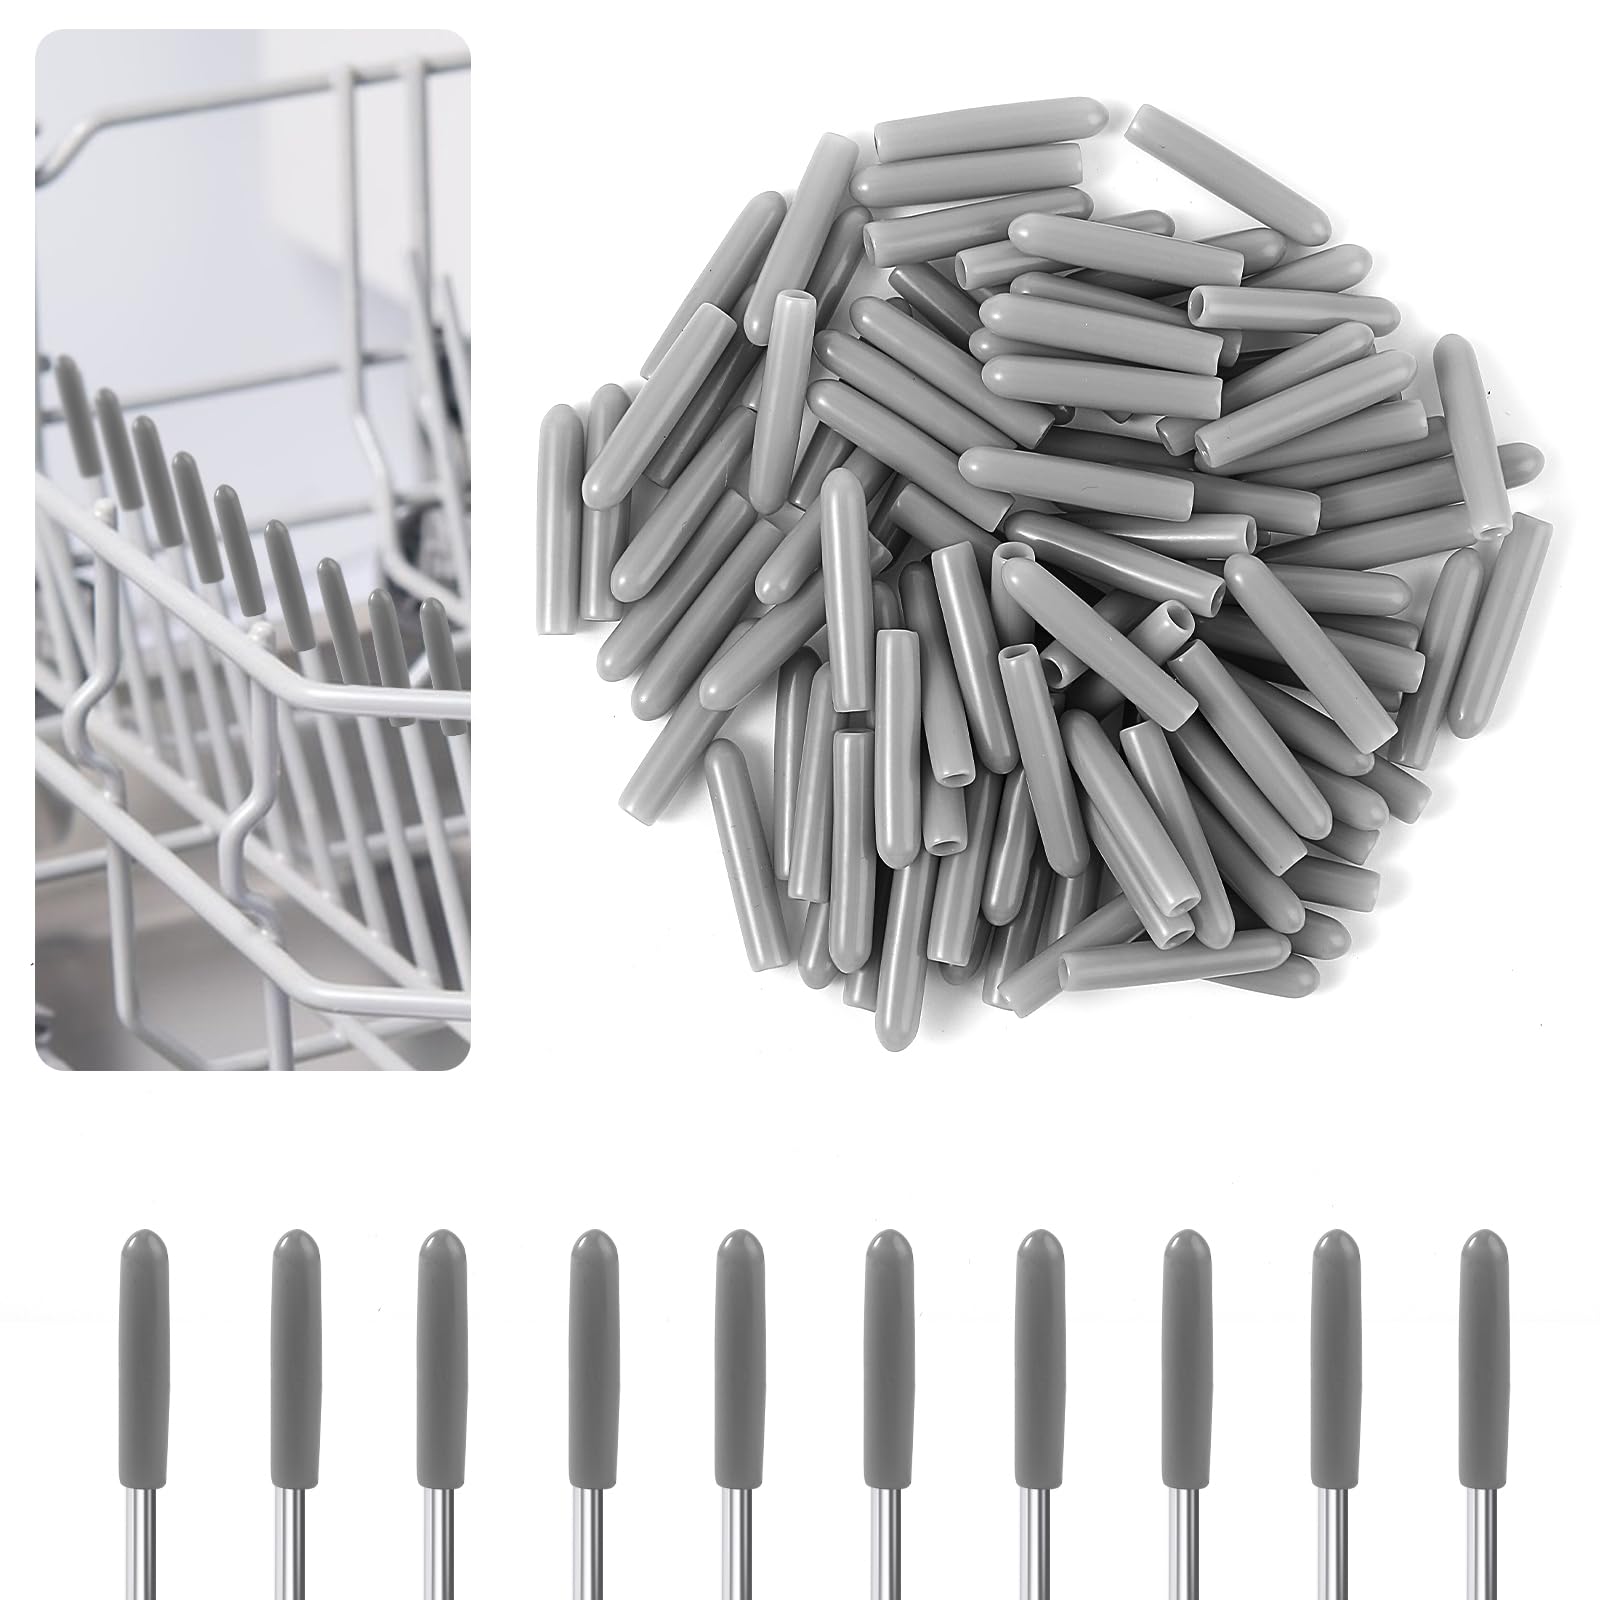
The fastest, cheapest fix is Cenipar rubber end caps. They cost $8 for a 100-pack and cover exposed metal, preventing rust transfer.
Installation:
- Warm caps in hot water for 1 to 2 minutes.
- Stretch over rusted tine tips until fully seated.
- Use pliers wrapped in cloth for tight fits.
- Trim if necessary for stubby tines.
User Feedback: No more brown spots on my white plates. I reordered when new rust appeared.
One pack covers multiple repairs. Replace caps every 1 to 2 years as they wear.
Prevent Future Coating Damage
- Avoid chlorine-based detergents.
- Use rinse aid to reduce mineral exposure.
- Don’t overload or force items onto bent tines.
Bosch and Samsung users report slower coating degradation when switching to gentler formulas.
Lubricate for Smooth Operation
Even clean, intact racks can squeak. A food-safe lubricant reduces friction and extends wheel life.
Use NSF-Certified Petrol-Gel
Never use WD-40 or household oils. These attract debris and aren’t safe near food.
Instead, apply Petrol-Gel sparingly to wheel axles, roller bearings, and rail contact points. Work the rack in and out 5 to 10 times, then wipe off excess to avoid dust buildup. Apply every 6 months or after deep cleaning.
Note: Lubrication helps but won’t fix broken parts. Use it as maintenance, not a repair.
Prevent Future Rack Problems
Most rack failures are preventable with simple habits. A few minutes a month can extend rack life by 3 to 5 years.
Clean Rails Monthly
- Remove racks and wipe rails with vinegar.
- Brush out debris with a soft toothbrush.
- Dry before reinserting.
Load Dishes Evenly
- Distribute heavy pots and pans across both sides.
- Don’t force the rack closed if obstructed.
- Avoid overloading, especially in upper racks.
Inspect Twice a Year
Check for loose wheels, cracked plastic, rust on tines, and misaligned height pins. Address small issues early, before they become costly repairs.
When to Replace the Entire Rack
Despite best efforts, some damage can’t be fixed. Consider full replacement if the frame is warped or bent, multiple adjusters are broken and parts unavailable, repair costs exceed $40 to $75, or loading remains difficult after fixes.
OEM racks cost $80 to $150 and install in minutes, but verify compatibility first. Aftermarket options are available on Amazon and appliance parts sites.
Rule of Thumb: If repairs cost less than 50 percent of a new rack, fix it. If not, replace.
Repair vs. Replace: Cost Comparison
| Solution | Cost | Time | Lifespan Gain |
|---|---|---|---|
| Replace adjusters (metal-screw) | $10 to $25 | 20 to 30 min | 5 to 8 years |
| Install tine caps (100-pack) | $8 | 10 to 20 min | 2 to 4 years |
| Clean plus lubricate rails | Under $5 | 15 to 30 min | 6 to 18 months |
| Full rack replacement | $80 to $150 | 10 min | Full life expectancy |
| New dishwasher | $500 plus | Hours | 7 to 12 years |
DIY repairs cost under 10 percent of a new rack and restore performance nearly to factory condition.
Tools You Will Need
Keep this repair kit ready:
- Slotted screwdriver
- Needle-nose pliers
- White vinegar
- Soft toothbrush
- Microfiber cloth
- Petrol-Gel (food-safe grease)
- Tine repair caps
- Replacement adjusters (model-specific)
Most are household items. Order parts in advance using your dishwasher’s model number.
Final Tips for Long-Lasting Racks
- Upgrade to metal-screw adjusters. They outlast plastic tabs by years.
- Warm tine caps before use. They stretch easier and seal better.
- Take photos during disassembly. Especially for clip systems.
- Clean rails before installing new parts. Debris causes early failure.
- Keep spare caps and brackets. Touch-ups take seconds when you’re prepared.
With these fixes, you’ll avoid unnecessary replacements and protect your dishes from rust and damage. Most repairs cost less than $25 and take less than half an hour, making how to fix dishwasher rack one of the most cost-effective home appliance skills you can master.
Frequently Asked Questions About Fixing Dishwasher Racks
How do I know if my dishwasher rack adjuster needs replacement?
Look for cracked plastic tabs on the brackets, missing or loose wheels, one side of the rack sitting lower than the other, or grinding and wobbling during movement. If the wheel spins freely but the bracket shows cracks, replacement is needed.
Can I fix a sticking dishwasher rack without replacing parts?
Often yes. Sticking is frequently caused by limescale or grease buildup on rails. Clean the rails with a 1 to 1 vinegar-water solution, scrub with a toothbrush, and dry thoroughly. For deeper buildup, run a commercial dishwasher cleaner cycle monthly.
Are aftermarket dishwasher rack parts reliable?
Yes. Aftermarket adjusters with metal screws often outperform original equipment manufacturer parts. Users report 5 plus years of trouble-free use. Just verify model compatibility before ordering.
How do I stop rust on dishwasher tine tips from staining my dishes?
Apply Cenipar rubber end caps (about $8 for 100-pack) to cover exposed rust. Warm the caps in hot water first for easier installation. Replace caps every 1 to 2 years as they wear.
When should I replace the entire dishwasher rack instead of repairing it?
Consider replacement if the rack frame is warped or bent, multiple adjusters are broken and parts are unavailable, or cumulative repair costs exceed $40 to $75. A full rack costs $80 to $150 but restores full functionality.
Key Takeaways for Fixing Your Dishwasher Rack
The most common dishwasher rack problems are broken adjusters, sticking rails, misaligned height pins, and rusted tines. Each has a proven DIY fix costing under $25. Replace cracked plastic adjusters with metal-screw aftermarket versions for lasting results. Clean rails monthly with vinegar and lubricate with food-safe grease every 6 months. Apply rubber tine caps to prevent rust staining on dishes. Address problems early through biannual inspections to avoid costly replacements. With minimal tools and under 30 minutes of work, you can restore your dishwasher rack to like-new condition and save hundreds of dollars.