How to Install a Dishwasher: Step-by-Step Guide
Installing a dishwasher may seem daunting, but with the right tools, preparation, and guidance, most homeowners can complete the job in 1.5 to 3 hours. This guide walks you through every step, from turning off utilities to running your first wash cycle, ensuring a safe, code-compliant, and leak-free installation. Whether you are replacing an old unit or installing one for the first time, this comprehensive process covers all critical aspects.
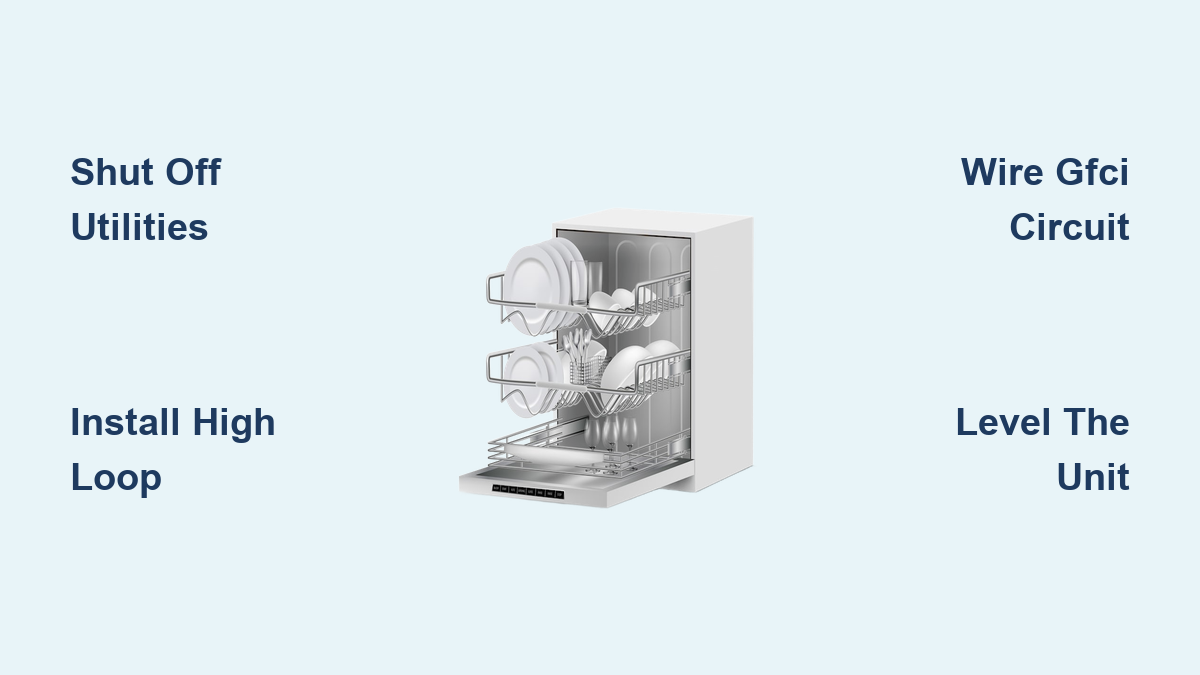
If you are searching for how to install a dishwasher, you need clear, actionable steps that prevent common mistakes. This guide shows you how to avoid siphoning, ensure GFCI protection, create a high loop, and level the unit properly. Let us get started.
Prepare the Installation Area
Confirm Space and Cabinet Dimensions
Before removing the old dishwasher or unpacking the new one, verify the cabinet opening matches standard dimensions: 24 inches wide, 24 inches deep, and 35 inches high. Most under-counter models are built to this size, but always check your model specifications.
Ensure 2 inches of rear clearance behind the unit to prevent kinking of water, drain, and power lines. Also confirm the floor is level and strong enough to support the dishwasher weight, which can reach up to 100 lbs when full.
Shut Off Utilities Safely
Safety starts here. Turn off the water shutoff valve under the sink and switch off the circuit breaker powering the dishwasher. Use a non-contact voltage tester to confirm no electricity is present. Place towels or a shallow pan under connections to catch residual water.
Failure to disconnect both water and power increases the risk of flooding or electrical shock.
Gather Required Tools and Materials
Collect everything before starting your dishwasher installation project.
Tools you will need:
• Adjustable wrench
• Screwdrivers (Phillips and flat-head)
• Drill with hole saw bits (1.5″, 2″, 3/4″)
• Bubble level (2-foot)
• Wire strippers
• Lineman’s pliers
• Utility knife
• Tape measure
• Non-contact voltage tester
Supplies to purchase:
• Braided stainless steel water supply line (5 to 6 ft)
• 3/8-inch brass compression adapter (if no shutoff exists)
• Drain hose clamp or spring clamp
• Teflon tape
• 12-2 NM electrical cable (for hardwired units)
• Appliance power cord (14/3 or 12/3 gauge)
• Mounting brackets and screws
• Rubber gasket and filter (for inlet valve)
All items are readily available at major home improvement stores.
Drill Cabinet Holes for Utilities

Position and Size the Holes Correctly
You will need two holes in the cabinet floor to route connections from the sink area to the dishwasher. The lower hole should be 1.5 to 2 inches in diameter for the water supply line and electrical cable. The upper hole should be 3/4 to 2 inches in diameter for the drain hose.
Place the drain hole as high as possible, near the top edge of the cabinet base. This positioning helps form a high loop later, preventing sink water from backing into the dishwasher.
Some models require alternative routing. A 1.5-inch hole in the top rear corner works for the water line, or a 3/4-inch hole in the bottom rear corner. Measure carefully to avoid interference with plumbing or cabinetry.
Remove the Toe Kick Panel
Take out the toe kick panel at the bottom of the cabinet for better access to mounting brackets, leveling feet, and utility connections. Set it aside. You will reinstall it after testing the installation.
Connect the Water Supply Line
Choose the Right Supply Line
Most dishwashers do not come with a water line. Buy a braided stainless steel hose (5 to 6 ft) because it is more durable than rubber or plastic and resists bursting.
If there is no dedicated dishwasher shutoff valve under the sink, install a 3/8-inch brass compression adapter or a dual shut-off valve. This allows you to control water to both the faucet and dishwasher independently.
Attach the Inlet Elbow
Follow these steps to attach the inlet elbow:
- Lay the dishwasher on its back, protecting the finish with a towel.
- Locate the water inlet valve on the bottom front.
- Insert the rubber gasket and internal filter (if not pre-installed).
- Thread the elbow fitting (included in kit) into the valve.
- Hand-tighten first, then turn 3/4 turn with a wrench.
- Do not over-tighten, especially if the valve is plastic, because stripped threads are a common failure point.
Route and Connect the Supply Line
Feed the braided stainless steel line through the lower cabinet hole from the sink side. Connect one end to the elbow fitting on the dishwasher and the other to the shutoff valve.
Tighten both ends snugly with an adjustable wrench. Apply Teflon tape if minor seepage occurs after pressurization.
Leave slight slack in the line to avoid stress when sliding the unit in.
Wire the Dishwasher Safely
Meet Electrical Code Requirements
Dishwashers must run on a dedicated 120V, 20-amp circuit with GFCI protection (NEC Article 210.8(A)(6)). Many jurisdictions also require AFCI protection (NEC Article 210.12) to prevent arc faults.
Use 12-2 NM cable with ground for hardwired installations. If plugging in, ensure the outlet is grounded and GFCI-protected.
Hardwire the Unit
To hardwire the dishwasher:
- Strip 5 inches of outer sheathing from the 12-2 cable.
- Separate the wires: black (hot), white (neutral), and bare copper (ground).
- Strip 1/2 inch of insulation from black and white.
- Install a Romex connector into the dishwasher junction box.
- Feed the cable through and tighten the clamp.
- Connect inside the box: black to L or Hot terminal, white to N or Neutral terminal, ground to green screw or bus bar.
- Twist wires with lineman’s pliers, cap with wire nuts, fold neatly into box.
- Reattach the cover.
Ensure the strain relief secures the cord and screw heads remain accessible.
Install a Power Cord (If Required)
Some models do not come with a pre-attached cord. To add one:
- Remove the lower front access panel.
- Open the terminal box.
- Connect green wire to ground, white to neutral, black to hot.
- Secure with screws or wire nuts.
- Snap the strain-relief clamp into place.
- Replace the panel.
Plug into a GFCI outlet under the sink. Never use an extension cord.
Install the Drain Hose Correctly
Pick a Drain Connection Method
The dishwasher drain hose must connect to a garbage disposal inlet (preferred) or a sink tailpiece (P-trap) via a drain saddle tee.
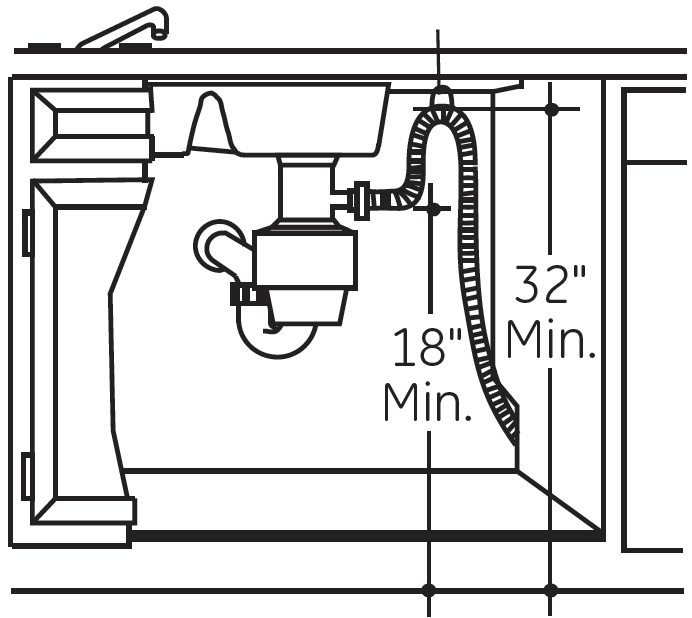
The connection must be above the P-trap to prevent siphoning.
Connect to Garbage Disposal
To connect to a garbage disposal:
- Remove the knockout plug from the disposal side port using a screwdriver and hammer.
- Slide a spring clamp over the end of the drain hose.
- Position the clamp between the two ridges on the hose.
- Push the hose firmly onto the disposal nipple.
- Tighten the clamp with pliers.
If the hose does not reach, replace it with a 6 to 7 ft model. Do not splice the hose.
Connect to Sink Drain Pipe
No disposal? Use a drain saddle tee on the P-trap tailpiece. Cut the pipe if needed and install the saddle with pipe dope on threads for a better seal. Attach the hose with a hose clamp.
Ensure the fitting allows upward routing to avoid backflow.
Prevent Backflow With High Loop or Air Gap
Create a high loop by running the drain hose up to the underside of the countertop before descending. Secure it with a bracket, zip tie, or wire. This keeps water from siphoning back into the dishwasher.
If installing an air gap, mount the device on the countertop or sink deck. Connect the dishwasher hose to the inlet port and a second hose from the outlet port to the disposal or drain. This method is required by local plumbing codes in many areas.
Never let the drain hose dip below the P-trap level because this causes siphoning and sewer gas entry.
Slide In and Level the Unit
Position the Dishwasher
Tilt the unit slightly upward to clear floor obstructions. Guide the power cord, water line, and drain hose behind the cabinet, avoiding kinks.
Slide the dishwasher straight in, centering it in the opening. Maintain 2 inches of rear clearance.
Adjust the Leveling Feet
The dishwasher has four adjustable feet, one per corner. Before insertion, extend each about 1/2 inch.
After positioning, place a 2-foot bubble level across the top front edge of the door. Adjust feet clockwise to raise and counterclockwise to lower. Level both side-to-side and front-to-back.
Proper leveling prevents vibration, noise, and drainage issues. Extra time spent leveling improves cleaning performance and reduces wear.
Secure and Finish Installation
Fasten Mounting Brackets
All dishwashers use adjustable brackets to secure the unit to the countertop or adjacent cabinets. Tabbed brackets insert into the frame slot, bend over, then screw to the countertop. Non-tabbed brackets attach directly with screws.
Pre-drill 1/16-inch pilot holes to prevent wood splitting. Use pan-head wood screws and tighten until stable. Do not over-tighten, which can damage countertops.
Fasten to the countertop substrate (such as plywood under granite) or cabinet side walls if no solid surface exists.
Reinstall Toe Kick and Trim
After securing the unit, reattach the toe kick panel with screws. Install rubber trim pieces around the front to seal gaps. Add side trims if needed. Cover unused mounting holes with plastic plugs.
Optional: Replace the junction box cover with a single-screw version for tamper resistance.
Test for Leaks, Drainage, and Power
Perform a Leak Test
To test for leaks:
- Slowly turn on the water shutoff valve.
- Run a short cycle (rinse or quick wash).
- Inspect for leaks at the water inlet valve, supply line connections, drain hose clamp, and pump area.
- Check again after 15 minutes because some leaks appear slowly.
If dripping occurs, tighten fittings slightly or replace gaskets.
Verify Drainage
During the cycle, listen for drain pump activation. Confirm water empties within 2 to 3 minutes. Watch for slow drainage or backup, which are signs of a clog or improper loop.
If there is no drainage, check whether the knockout plug was removed from the disposal, whether the hose is kinked or compressed, and whether the high loop is properly secured.
Check Electrical Function
Restore power at the breaker. Confirm the control panel powers on, display lights up, and buttons respond. Ensure no error codes appear.
If error codes flash, check the ground wire connection, verify hot and neutral wires are not reversed, and ensure wire nuts are tight.
Handle Special Installation Scenarios
No Garbage Disposal
Connect the drain hose directly to the P-trap tailpiece using a drain saddle tee. Install a high loop to prevent backflow. An air gap may be required by code, so check local regulations.
Retrofitting in Older Homes
If no existing connections exist, a plumber may need to tap into the hot water line. An electrician may need to install a dedicated GFCI or AFCI circuit. Add a drain saddle or air gap for code compliance.
Consider professional installation ($150 to $300) if modifications are needed. The DIY success rate is approximately 85%, but older homes often lack proper infrastructure.
Maintain Your Dishwasher for Longevity
Follow Routine Maintenance
To extend lifespan and prevent issues, inspect connections every 6 months. Clean the air gap every 3 months. Run a vinegar cycle monthly to remove buildup. Clean the filter monthly.
Replace Worn Components
Replace rubber hoses and gaskets every 5 to 7 years. The water inlet valve and pump typically last 8 to 12 years with proper care.
Register Your Warranty
Most brands offer a 1-year limited warranty. Register online using the model number for full coverage. Extended warranties are available at retailers.
Need help? Contact Whirlpool at 1-866-698-2538 or visit manufacturer websites for manuals and support.
Frequently Asked Questions About Dishwasher Installation
How long does it take to install a dishwasher?
The average DIY installation takes 1.5 to 3 hours, depending on your experience level and whether you are replacing an existing unit or installing new connections.
Can I install a dishwasher myself, or do I need a professional?
Approximately 85% of homeowners successfully install dishwashers themselves. However, if your home lacks proper electrical or plumbing connections, professional installation ($150 to $300) may be necessary.
What tools do I need to install a dishwasher?
You need an adjustable wrench, screwdrivers, drill with hole saw bits, bubble level, wire strippers, lineman’s pliers, utility knife, tape measure, and non-contact voltage tester.
Do I need a GFCI outlet for a dishwasher?
Yes, NEC Article 210.8(A)(6) requires GFCI protection for all kitchen dishwashers. This prevents electrical shock in wet environments.
Why is my dishwasher not draining after installation?
Common causes include a missing knockout plug in the garbage disposal, a kinked drain hose, or an improperly secured high loop. Check all three to resolve drainage issues.
Key Takeaways for Installing Your Dishwasher
Installing a dishwasher is a manageable DIY project when you follow safety protocols and code requirements. Focus on four critical areas for long-term performance. First, ensure proper water connections by using braided stainless steel lines and securing all fittings with gaskets. Second, provide GFCI electrical wiring with a dedicated 20-amp circuit. Third, route the drain hose correctly with a high loop or air gap to prevent siphoning. Fourth, level the unit properly to reduce vibration and improve cleaning performance.
When in doubt, consult a licensed plumber or electrician. With the right approach, your new dishwasher will deliver years of reliable, quiet, and efficient cleaning.