How to Install Bosch Dishwasher: Step-by-Step Guide
Installing a Bosch dishwasher can transform your kitchen with quiet, efficient cleaning, but only if done correctly. Whether you are upgrading an old unit or installing your first dishwasher, proper setup is critical to avoid leaks, electrical issues, and poor performance. This guide walks you through how to install a Bosch dishwasher step by step, using verified procedures from official manuals and professional best practices. You will learn how to connect water and power safely, route the drain hose properly, level the unit, and test for leaks.
Safety First: Power and Water Shutdown
Before touching any wires or pipes, protect yourself and your home from hazards.
Turn Off Power and Water
Switch off the circuit breaker supplying power under the sink. Never assume the outlet is dead. Verify with a voltage tester. At the same time, shut off the water supply valve beneath the sink or at the main line. This prevents accidental flooding during installation.
Prepare the Worksite
Clear space under the sink cabinet. If replacing an old dishwasher, disconnect the power cord, water supply line, and drain hose. Place a drip pan or bucket under connections to catch residual water. Stuff paper towels into open hoses to absorb drips. Remove shipping materials like foam inserts and wooden supports from the new Bosch unit.
Warning: Only cut the old power wire if the circuit is confirmed dead. Cap exposed wires with wire nuts if not reconnecting immediately.
Verify Clearance and Cabinet Fit
Ensure your cabinet fits the Bosch model before sliding the unit in.
Check Cabinet Dimensions
Bosch dishwashers fit standard 24-inch openings. Confirm the width is 23.5 to 24 inches, depth is approximately 24 inches not including the door, and height is adjustable from 33.5 to 35 inches. Allow space for connections. If installing for the first time, you may need to drill a hole for water, drain, and power lines. Existing cutouts should be inspected for proper alignment.
Connect the Water Supply Line

The water connection is critical. Use the right parts and avoid over-tightening.
Install the 3/8 Inch Elbow Adapter Kit
Bosch U.S. models including 300, 500, and 800 Series have a 3/4 inch inlet on the right side. You must use the included 3/8 inch elbow adapter kit. This kit includes a 3/4 inch to 3/8 inch reducer elbow with a rubber O-ring. Do not use Teflon tape, pipe dope, or thread sealant because these can damage the seal.
Screw the adapter onto the dishwasher inlet by hand. Mark the hand-tight position, then use a wrench to turn exactly 1/2 turn further. Over-tightening can crack the plastic housing.
Attach the Supply Hose
Connect a braided 3/8 inch stainless steel hose to the adapter. Hand-tighten first, then use a 5/8 inch wrench for an extra 1/4 to 1/2 turn. Support the elbow while tightening to avoid stress. Route the hose through the right-side opening with the drain and power lines.
Pro Tip: Keep the connection no more than 7 inches from the floor and 2.5 inches from the wall for optimal fit.
Water Temperature and Pressure Requirements
For best cleaning performance, use hot water at 120 degrees Fahrenheit. Avoid water over 140 degrees because it degrades detergent effectiveness. Ensure pressure is between 20 and 120 psi. Never remove the white filter cap inside the inlet because it is a built-in debris filter.
Wire the Electrical Connection
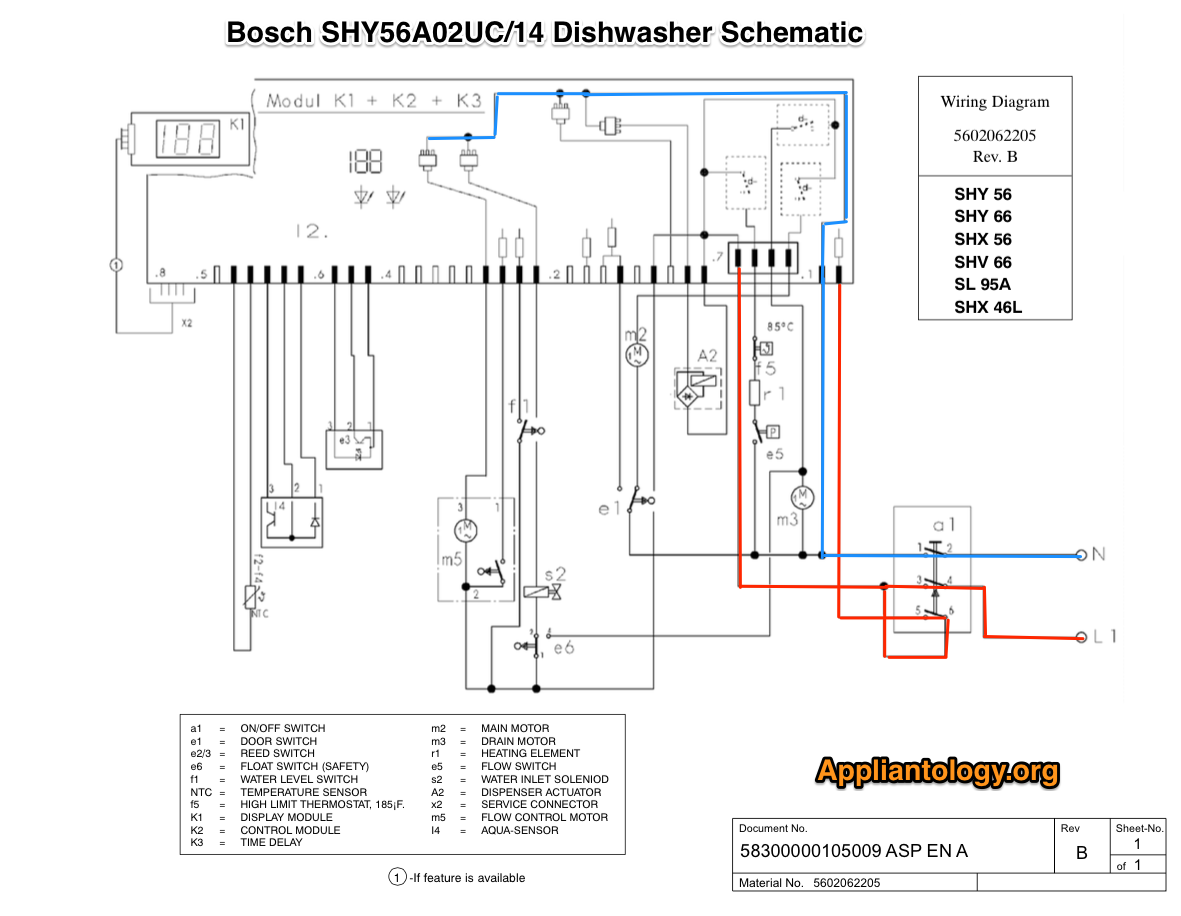
Bosch dishwashers use a plug-in power cord, not hardwiring.
Access the Junction Box
Remove the front access panel. The electrical junction box is underneath. Unscrew the cover to expose three terminals: gold for hot black wire, silver for neutral white wire, and green for ground copper wire.
Connect the Power Cord
Feed the cord through the cabinet loop and secure with zip ties to prevent strain. Route into the junction box behind the strain-relief connector. Strip wire ends to 1/2 inch and connect black to gold, white to silver, and copper to green ground screw. Tighten screws firmly and reattach the junction box cover.
No Outlet? Use a Junction Box Adapter Kit
If no GFCI outlet exists under the sink, install a junction box adapter kit per Bosch specs. This creates a safe, code-compliant outlet. Plug the dishwasher cord directly into it.
Test the Outlet
Use an outlet tester to confirm correct polarity, proper grounding, and GFCI functionality. Press the Test button to verify. Ensure the circuit is 120V, 15-amp, and GFCI-protected as required by Bosch and NEC code.
Set Up the Drain Hose
A correct drain setup prevents backflow and odors.
Create a High Loop
The drain hose must form a high loop at least 33 inches above the floor. This stops sink water from siphoning back into the dishwasher. Route the hose up and over the sink cabinet, then down to the drain. Secure it with zip ties to the cabinet frame or a black bracket if multiple lines share one hole.
Never lay the hose flat because this causes backflow and code violations.
Connect to Garbage Disposal or Air Gap
Attach the hose to the inlet on the garbage disposal, which is preferred, or to the sink drain pipe via an air gap required in some areas. Slide the clamp onto the hose, push the hose firmly onto the fitting, and tighten the clamp with pliers or a screwdriver. Ensure the hose end is higher than the dishwasher drain inlet.
Level and Mount the Dishwasher
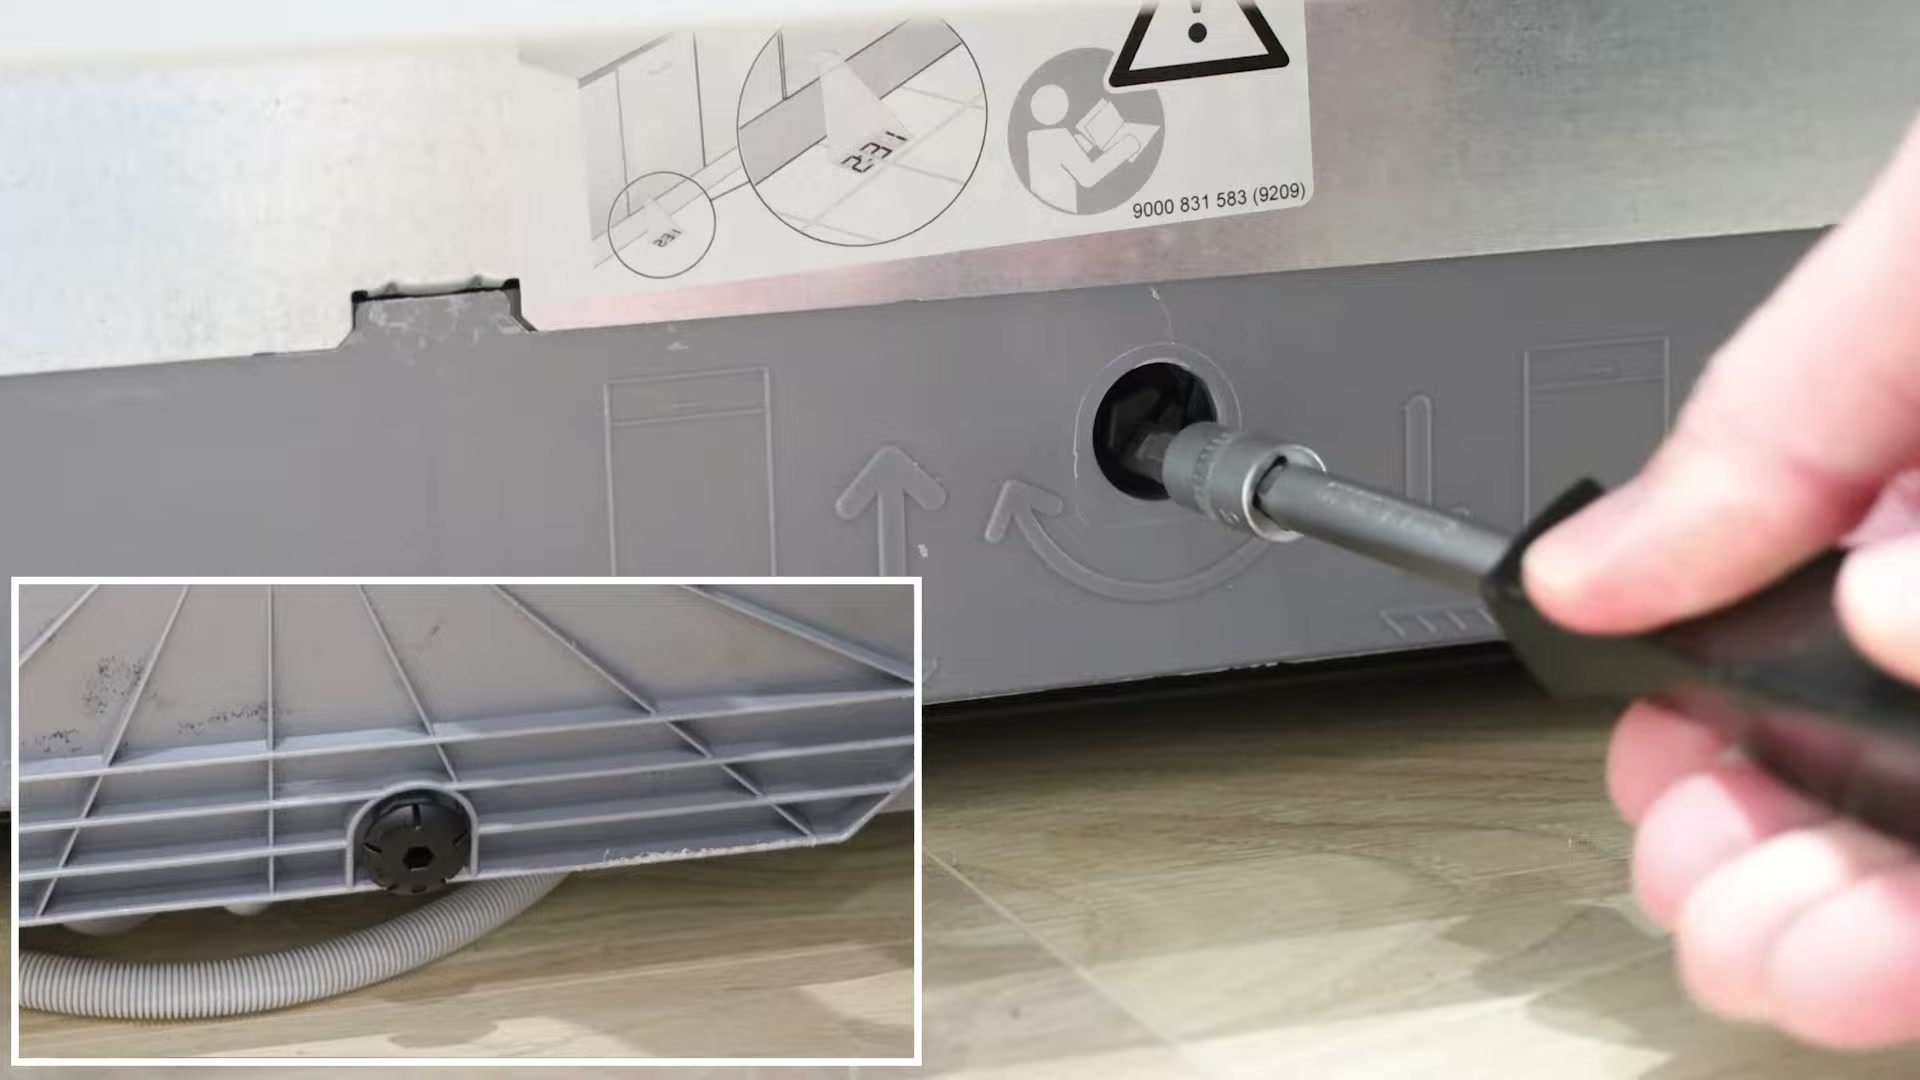
Proper leveling ensures quiet, stable operation.
Adjust the Leveling Feet
Start with the front leveling feet. Turn clockwise to raise on most models, but check your manual. The goal is to have the top of the unit sit 1/2 inch below the countertop before final leveling. Use the rear leveling screw at the center back to tilt the unit slightly backward. Turn clockwise to raise and create a 1 to 2 degree backward slope to prevent water pooling at the door.
Check with a Bubble Level
Place a bubble level on the door frame or upper rack. Check left-to-right and front-to-back alignment. Adjust feet in small increments. Loosen with a 1/4 turn before adjusting to prevent binding. Avoid over-tightening because this can cause the unit to rock.
Secure with Mounting Brackets
Bosch offers two mounting options. For top mounting, insert brackets into top slots, align with holes in the underside of the countertop, and secure with two wood screws. For side mounting in tight spaces, bend bracket ends back along the dotted line, insert into side slots, and bend flanges downward to lock. Use pliers to bend winged ends inward for a secure fit.
Slide the Unit In
Push in one-third, then pull slack into the cabinet. Push to two-thirds and repeat. Fully seat the unit and center for 1/4 to 1/2 inch gaps on both sides. Final alignment should be flush with cabinets with no rocking.
Final Connections and Leak Test
Before closing up, verify everything works.
Reconnect Water Supply
Under the sink, apply three wraps of plumber tape to the fitting. Hand-tighten the supply line, then add 1/4 turn with a crescent wrench. Do not overtighten. Turn water back on slowly.
Inspect for Leaks
Check the water inlet at the dishwasher and under the sink, the drain hose clamp, and the garbage disposal or drain connection. Look for drips and tighten slightly if needed.
Restore Power
Flip the circuit breaker back on. Plug in the power cord. Route excess neatly and secure with zip ties.
Final Assembly and Test Run
Finish the job with sealing and a test cycle.
Install the Toe-Kick Panel
Align the toe-kick panel with the front of the dishwasher and secure with two screws.
Apply Steam Guard Strip
A steam guard adhesive strip can be added to the door opening to contain steam during drying. Many users skip this without issues.
Run a Test Cycle
Start a short wash cycle such as rinse or quick wash. Monitor for proper water intake, drainage without leaks, motor and pump noise, error codes, and standing water. A red indicator light on the floor means the dishwasher is running. Keep the door closed during cycles.
Maintenance and Warranty Tips
Keep your Bosch running smoothly for years.
Monthly Maintenance
Clean the filter assembly. Check spray arms for clogs. Inspect seals and gaskets for mold or debris. Verify the drain hose has no kinks.
Warranty Coverage
Bosch dishwashers come with a 1-year standard warranty covering parts and labor. The 800 Series offers up to 10 years on motor and tub. Register online at Bosch Home to extend coverage. Warranty requires installation per local codes and following Bosch guidelines.
Troubleshoot Common Issues
Why Is My Dishwasher Leaking?
Likely causes include an overtightened water fitting. Replace the O-ring and retighten with 1/2 turn past hand-tight. A loose drain clamp requires reconnection and secure tightening. A missing high loop means re-routing the hose to 33 inches.
Why Is There a Sewage Smell?
You likely missed the high loop. The drain hose must rise above the dishwasher drain inlet. Reinstall with proper loop and secure connection to the disposal.
Why Will It Not Power On?
Check if the GFCI is tripped and reset the outlet. Verify the cord is seated properly. Open the junction box and recheck loose wiring connections.
Why Is It Too Noisy?
An unlevel unit requires rechecking with a bubble level. Loose mounting needs bracket tightening. Ensure no hose lines rub against the cabinet.
Tools and Time Needed
Required Tools
You will need an adjustable wrench, screwdrivers Phillips and flathead, wire strippers, bubble level, zip ties, towels or drip pan, flashlight, safety gloves, plumber tape, crescent wrench, drill if modifying cabinetry, and a voltage tester.
Time Estimate
Allow 2 to 4 hours for a full installation. Have a second person assist because Bosch units weigh 75 to 90 pounds.
Expert Tip: Watch official Bosch installation videos on YouTube for visual guidance.
Critical Do is and Do Nots
Do
You should shut off power and water before starting. Use the 3/8 inch elbow adapter. Form a 33 inch high drain loop. Level the unit carefully. Hand-tighten connections then add 1/4 to 1/2 turn. Test for leaks before finalizing. Register the product.
Do Not
Never use Teflon tape on the inlet. Do not remove the white filter cap. Avoid overtightening plastic fittings. Do not skip GFCI verification. Never install without a high loop.
Frequently Asked Questions About Installing a Bosch Dishwasher
Do I need a professional to install a Bosch dishwasher?
No, you can install a Bosch dishwasher yourself if you have basic DIY skills and the right tools. However, if you are uncomfortable working with electrical or plumbing connections, hiring a professional is recommended.
Can I install a Bosch dishwasher myself?
Yes, with proper preparation and by following the step-by-step procedures in this guide, a DIY installation is achievable. Allow 2 to 4 hours and enlist a second person to help with the heavy unit.
What tools do I need to install a Bosch dishwasher?
You will need an adjustable wrench, screwdrivers, wire strippers, bubble level, zip ties, plumber tape, crescent wrench, voltage tester, and possibly a drill if cabinet modifications are needed.
How long does it take to install a Bosch dishwasher?
Most installations take 2 to 4 hours, depending on your experience level and whether you are replacing an existing unit or doing a first-time installation.
Do I need to use Teflon tape on the water connection?
No, do not use Teflon tape, pipe dope, or thread sealant on the Bosch water inlet. The included O-ring provides a proper seal, and these materials can damage it.
Key Takeaways for Installing Your Bosch Dishwasher
A properly installed Bosch dishwasher delivers quiet, efficient cleaning for a decade or more when you follow the correct procedures. The most critical steps are turning off power and water before starting, using the included 3/8 inch elbow adapter for U.S. models, forming a 33 inch high drain loop to prevent backflow, and carefully leveling the unit to ensure quiet operation. Always test for leaks before finalizing the installation, and register your product to activate warranty coverage. When in doubt, consult your model-specific manual or hire a licensed professional. Your kitchen and your peace of mind will thank you.